Your SEO score is a snapshot of how well your website is optimized across four areas: technical performance, content quality, on-page signals, and authority. To increase it, you need to fix crawlability issues, strengthen your content for both humans and AI systems, pass Core Web Vitals, and build topical authority over time. This guide walks you through exactly how to do each one, in order of impact.
I’ve been doing SEO for over a decade. I’ve seen the game shift from keyword stuffing to helpful content to AI-generated answers. What I’m sharing here reflects what actually moves the needle in 2026, not what worked three years ago.
- What Is an SEO Score (and Why You Should Take It With a Grain of Salt)
- The Four Pillars of a Strong SEO Score
- Step 1: Fix Technical SEO First
- Step 2: Sharpen Your On-Page SEO
- Step 3: Create Content That Actually Ranks
- Step 4: Build Authority the Right Way
- Step 5: Optimize for AI Search (GEO)
- Tools to Measure Your SEO Score
- SEO Score Improvement Checklist
What Is an SEO Score (and Why You Should Take It With a Grain of Salt)
An SEO score is an aggregate metric that tools like Semrush, Ahrefs, SE Ranking, and SEOptimer use to grade your site’s overall health. These tools crawl your pages and assign a score based on factors like broken links, missing meta tags, page speed, and on-page optimization.
Here’s the thing though: your SEO score from a third-party tool and your actual Google rankings are two different things.
I’ve seen sites with a 95/100 tool score sitting on page 4. And I’ve seen sites with a 62/100 generating thousands of organic visits a month. The score is useful as a starting diagnostic, but it does not directly tell Google where to rank you.
What does matter is fixing the underlying issues those tools are flagging. The score goes up when the site improves, and the rankings follow when the improvements are meaningful. That’s how I use it.
The Four Pillars of a Strong SEO Score
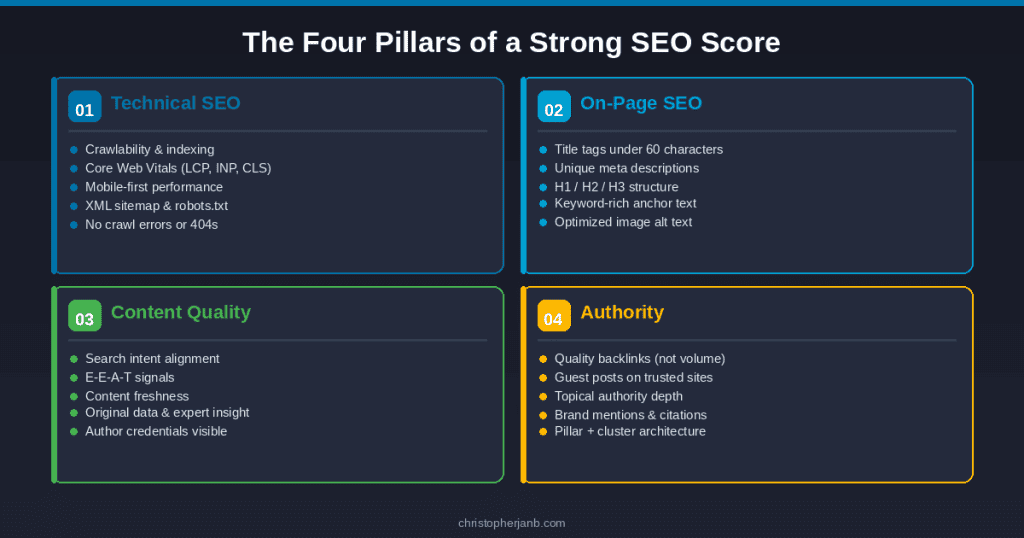
Before diving into fixes, it helps to understand what actually drives the number. Every legitimate SEO audit tool measures some combination of these four areas:
Technical SEO covers crawlability, indexing, site speed, mobile usability, and Core Web Vitals. If Google can’t access and understand your pages, nothing else matters.
On-page SEO covers title tags, meta descriptions, header structure, internal links, and keyword optimization. This is where most beginners start and where most basic issues live.
Content quality covers search intent alignment, depth, freshness, and E-E-A-T signals. Google’s Helpful Content updates made this the most important factor on the list.
Authority covers backlinks, brand mentions, and how well your site is recognized as a trusted source in your niche. This is the hardest to build and the slowest to move.
Let’s go through each one.
Step 1: Fix Technical SEO First
Technical issues are the easiest to identify and the most urgent to fix. A single crawl error on an important page can wipe out months of content work. I’ve put together a detailed technical SEO site audit guide if you want to run through the full process step by step.
Run a Google Search Console Audit
If you have not connected your site to Google Search Console yet, do that today. It is free and it is the only tool that shows you exactly what Google sees when it crawls your site.
Once you are inside, check three things immediately:
Go to Pages under Indexing. Look for pages marked “Crawled, currently not indexed” or “Discovered, currently not indexed.” These are pages Google found but is not ranking. Common causes are thin content, duplicate content, or a noindex tag you forgot about.
Go to Core Web Vitals. This report shows your LCP, INP, and CLS scores based on real user data. Any pages flagged as “Poor” need attention before anything else.
Go to Manual Actions. If Google has penalized your site for any reason, this is where it will tell you. Most sites have nothing here, but it is worth checking.
Fix Your Core Web Vitals
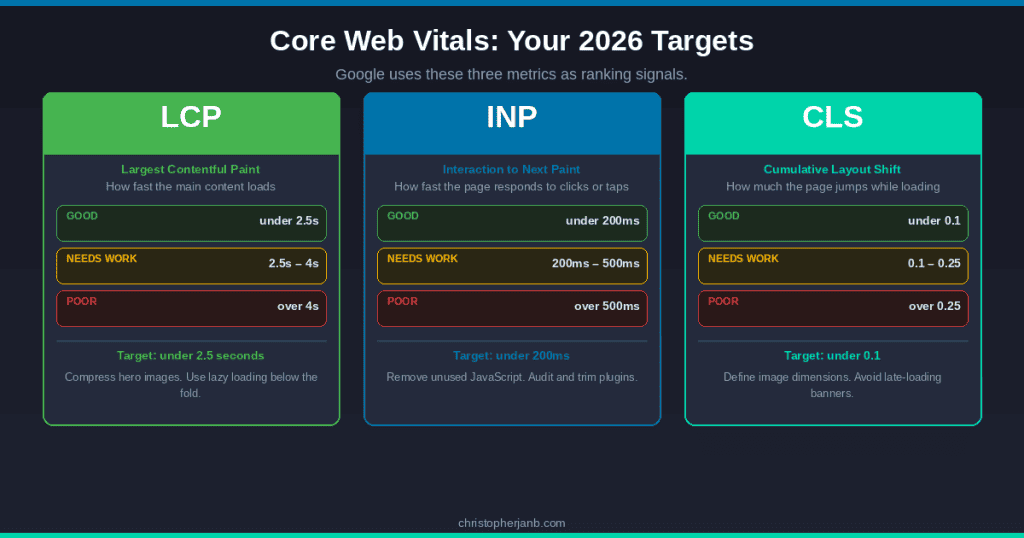
Core Web Vitals are three metrics Google uses as ranking signals. As of 2026, the three are:
LCP (Largest Contentful Paint) measures how fast the main content of a page loads. Your target is under 2.5 seconds. The most common culprit on WordPress sites is unoptimized hero images. Compress your images with a tool like ShortPixel and implement lazy loading on anything below the fold.
INP (Interaction to Next Paint) replaced FID in 2024 and measures how quickly your page responds to user interaction like clicks or taps. Your target is under 200ms. Bloated JavaScript and too many third-party scripts are usually the problem here. Audit your plugins and remove anything you are not actively using.
CLS (Cumulative Layout Shift) measures how much your page visually jumps around while loading. Your target is under 0.1. Always define dimensions for your images and avoid inserting ads or banners that push content down as the page loads.
Run your pages through Google PageSpeed Insights to get specific recommendations per URL. It is free and gives you both mobile and desktop scores.
Check Crawlability and Indexing
A few quick things to verify:
Make sure your XML sitemap is submitted in Search Console and does not include pages you have marked noindex. Contradictory signals confuse crawlers.
Check your robots.txt file. I have seen sites accidentally block Googlebot from crawling entire sections of their site. Visit yourdomain.com/robots.txt and confirm nothing important is blocked.
Fix broken internal links. A tool like Screaming Frog (free up to 500 URLs) will crawl your entire site and flag any 404 errors. Each broken internal link wastes crawl budget and kills user experience.
Step 2: Sharpen Your On-Page SEO
Once your technical foundation is solid, on-page optimization is where you can move fast.
Title Tags and Meta Descriptions
Your title tag is the single most important on-page SEO element. Every page should have a unique title that includes the primary keyword close to the front and stays under 60 characters.
Do not write your title for Google alone. Write it for the person deciding whether to click your result over the ten others on the page. Ask yourself: would I click this?
Meta descriptions do not directly affect rankings, but they absolutely affect CTR. A compelling meta description at position 12 can outperform a lazy one at position 8. Keep it under 155 characters, include your keyword, and end with something that makes the reader feel like they need to click.
Header Structure
Every page should have one H1 that matches the intent of the target keyword. Your H2s should cover the main sub-topics of the page. H3s go under H2s for more specific points.
I see a lot of writers using bold text or random caps for subheadings instead of proper header tags. Google cannot parse those as structure. Use actual H2 and H3 tags in your CMS.
Internal Linking
Internal links are how you pass authority from one page to another within your site. They are one of the most underused levers in SEO.
Every time you publish a new piece of content, go back through your existing posts and add contextual links to it from relevant pages. Use keyword-rich anchor text, not “click here” or “read more.”
Your most important pages, pillar guides, service pages, and high-converting posts should have the most internal links pointing to them. This tells Google which pages matter most.
Image Optimization
Every image on your site should have a descriptive alt text that includes a relevant keyword where natural. File names matter too. “how-to-increase-seo-score-google-search-console.jpg” beats “image1.jpg” every time.
Compress everything before upload. A 3MB hero image is one of the fastest ways to tank your LCP score.
Step 3: Create Content That Actually Ranks
This is where most SEO advice from 2020 falls apart. Google has fundamentally changed how it evaluates content since the Helpful Content Update rolled out in 2022 and continued through 2024 and 2025.
Match Search Intent Precisely
Before you write anything, search your target keyword and look at the top five results. What format are they using? What questions are they answering? What angle are they taking?
If the top results are all step-by-step guides and you write a listicle, you are fighting the SERP instead of working with it. Google has already told you what it thinks searchers want. Give them that. My SEO content writing guide goes deep on how to read and match search intent for any keyword.
Build E-E-A-T Into Your Content
E-E-A-T stands for Experience, Expertise, Authoritativeness, and Trustworthiness. It is the framework Google uses to evaluate content quality, and it is now more important than any keyword tactic.
Experience means showing that you have actually done the thing you are writing about. I do not just write about SEO in theory. I have been doing it for clients since 2013. When I mention that, and back it up with specific results or examples, it signals real-world experience to both readers and Google’s quality evaluators.
Expertise means demonstrating deep subject knowledge. Go beyond the surface. Explain the why behind your recommendations, not just the what.
Authoritativeness comes from external recognition. Being published on Search Engine Journal, Niche Pursuits, and Blogging Wizard builds this over time. Every byline you earn on a recognized publication reinforces your authority in the eyes of Google.
Trustworthiness comes from accurate information, transparent sourcing, clear authorship, and a site that does not make people feel like they are about to get scammed. Author bios, testimonials, and privacy policies all contribute here.
Keep Content Fresh
Google rewards freshness, especially in competitive niches. If you have posts that have not been updated in two or more years, they are probably losing ground to newer content that covers the same topic.
Refreshing content does not mean rewriting from scratch every time. Sometimes all it takes is updating statistics, removing dead links, adding a new section that covers something competitors have started covering, and changing the publish date.
I check my top-performing posts at least once a quarter and update anything that has aged badly.
Step 4: Build Authority the Right Way
Authority is the slowest part of SEO to build but one of the highest-leverage. A single link from a high-DR publication in your niche can move a page more than dozens of on-page tweaks.
Focus on Quality Over Volume
The era of building hundreds of low-quality backlinks to rank is over. Google is significantly better at detecting and discounting manipulative link patterns. One link from Search Engine Journal carries more weight than a hundred links from random blog networks.
The most reliable ways to build quality links in 2026 are guest posting on industry publications, creating original research or data studies that others want to cite, and digital PR that gets you mentioned in news articles and roundups.
Reclaim Unlinked Brand Mentions
This is one of the easiest wins most sites leave on the table. Search for your name and your site’s name on Google. Find any mentions that do not include a hyperlink. Reach out to the site owner and ask them to add one.
These are warm outreach targets because they already know who you are. Conversion rates on unlinked mention outreach are typically 20 to 30 percent.
Build Topical Authority
In 2026, Google rewards sites that comprehensively cover a topic over sites that have one great post surrounded by unrelated content. This is the whole argument for pillar content and content clusters.
If your site covers SEO and content writing, every supporting post should connect back to your pillar guides through internal links. The cluster of related content tells Google that your site is a serious resource on the topic, not just a collection of random posts.
Step 5: Optimize for AI Search (GEO)
Generative Engine Optimization is not replacing SEO. It is extending it into a new channel. AI Overviews appear in a significant portion of Google searches. ChatGPT and Perplexity are now referral traffic sources for many sites. Getting cited in these systems requires a slightly different approach to content structure.
Lead With Direct Answers
AI systems pull content from the opening section of your page when generating answers. If your first paragraph is a story or a hook, you miss the citation window. Put a concise, direct answer to your target question in the first 60 to 80 words of every post.
Add FAQ Schema
FAQ schema markup tells Google exactly what questions your page answers and in what format. AI systems use structured data to identify authoritative answers. Add five to eight Q&A pairs to your most important posts using FAQ schema.
Every FAQ question should mirror the conversational phrasing people use when asking AI assistants. “What is an SEO score?” gets you further than “SEO score definition.”
Include Citation-Worthy Data
Research shows that AI systems preferentially cite content that includes statistics from credible sources, expert quotes, and original data. Include at least one cited statistic per major section of your content. Link to the primary source, not an intermediary article.
Tools to Measure Your SEO Score
You do not need to pay for six tools to track your SEO health. Here is what I actually use:
Google Search Console is free and the most accurate source of truth for how Google sees your site. Use it to track impressions, clicks, CTR, average position, Core Web Vitals, and indexing issues.
Google PageSpeed Insights is free and gives you Core Web Vitals data per URL with specific improvement recommendations.
Semrush or Ahrefs for a comprehensive site audit score, backlink tracking, and keyword rank monitoring. Either one is worth the investment if SEO is central to your business.
Screaming Frog (free up to 500 URLs) for crawling your site to find broken links, missing meta tags, duplicate content, and redirect chains.
You do not need all of these on day one. Start with Search Console and PageSpeed Insights. Add a paid tool when you are ready to go deeper on backlinks and keyword tracking.
SEO Score Improvement Checklist
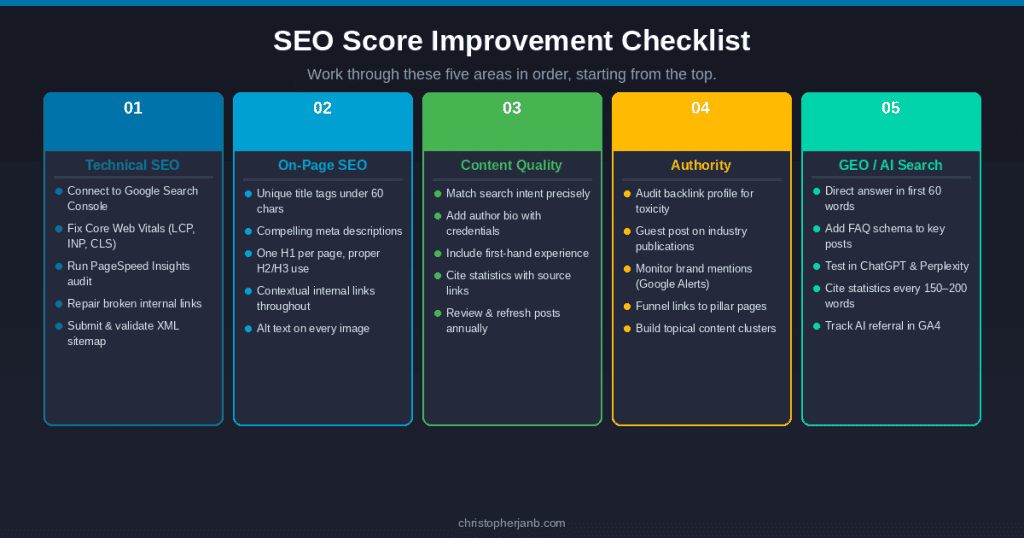
Use this to work through your site systematically. Start from the top and move down.
Technical SEO
- Connect site to Google Search Console and review index coverage
- Check Core Web Vitals report and fix any “Poor” pages
- Run site through PageSpeed Insights for mobile and desktop scores
- Fix broken internal links with Screaming Frog or a similar crawler
- Verify XML sitemap is submitted and does not include noindex pages
- Confirm robots.txt is not blocking important pages
On-page SEO
- Every page has a unique title tag under 60 characters with primary keyword
- Every page has a unique meta description under 155 characters
- One H1 per page that matches the target keyword intent
- H2 and H3 tags used for all subheadings (no bold text substituting for headers)
- Internal links added from related posts to each new piece of content
- All images have descriptive alt text and compressed file sizes
Content quality
- Each post directly matches the search intent of its target keyword
- Author bio is present with credentials and experience
- Content includes first-hand examples, personal experience, or original data
- Statistics are cited with links to primary sources
- Posts reviewed and refreshed at least once a year
Authority
- Backlink profile checked for any toxic or spammy links
- Guest post strategy in place targeting industry publications
- Brand mentions monitored with Google Alerts
- Internal links funnel authority to pillar pages and key service pages
GEO
- First paragraph of each post includes a direct, extractable answer
- FAQ schema added to pillar guides and high-traffic posts
- Content tested manually in ChatGPT, Perplexity, and Google AI Overviews
- AI referral traffic tracked in Google Analytics 4
Improving your SEO score is not a one-time project. It is a system you build and maintain. Fix the technical issues first because those are the foundation. Then sharpen your content to match what searchers and AI systems are actually looking for. Then build authority through links and brand recognition that compounds over time.
I have been doing this for clients and for my own site for over a decade. The fundamentals have not changed that much. What has changed is the bar. The sites winning in 2026 are the ones that do all of it well, not just one part of it.
If you want help with any of this for your own site, my SEO audit and content reoptimization services are a good place to start.