There’s a comfortable assumption behind a lot of marketing budgets right now. If we already rank well in Google, we’ll show up when people ask ChatGPT too. The SEO is done, so the AI visibility tags along for free.
I didn’t want to assume it. I wanted to measure it.
So I ran a small experiment. I took four email marketing platforms, ranked them by how well they perform in traditional Google search, then measured how often each one actually gets recommended across the big AI answer engines. Same brands, two scoreboards: SEO on one side, AI search visibility on the other.
If good SEO reliably turned into AI visibility, the two scoreboards would line up. They didn’t. They nearly inverted. Here’s the full test, the data behind it, and what it means if you’re trying to get found when buyers ask AI.
Why SEO and AI Visibility Are Not the Same Thing
Search is splitting into two habits. People still Google. But more and more, they also ask ChatGPT, read Google’s AI Overviews, or run a question through Perplexity or Gemini and take the answer at face value.
That creates a new question most brands haven’t measured:
- Google ranking tells you where your page sits for a keyword.
- AI visibility tells you whether an AI recommends your brand when someone asks.
Those sound like the same thing. The work of optimizing for the second one even has its own names now, answer engine optimization (AEO) and generative engine optimization (GEO). But nobody had shown me hard data on whether the first buys you the second. So I tested it, and I picked a category where the answer would be clear.
The Test: How I Measured SEO Against AI Visibility
This is the part that makes the finding trustworthy, so I’ll be specific about how it ran.
The Four Brands
I used four email marketing platforms, chosen because they sit at clearly different levels of SEO strength:
- Mailchimp, the category giant that everyone already knows.
- MailerLite, the strongest of the three challengers in Google.
- Moosend, a mid-tier player in search.
- EmailOctopus, the smallest search footprint of the group.
The Rule I Set First
I ranked the four on SEO metrics before I ran a single AI query. The order was locked in based on Google performance alone, using organic traffic value and page-one keyword counts. That matters. It means I couldn’t pick the story after seeing the AI results.
The Engines and Prompts
- I measured all four across the four engines that carry the most weight today: ChatGPT, Google AI Overviews, Perplexity, and Gemini.
- I used 12 buyer-intent prompts, the kind people actually type: “best email marketing software,” “best tool for a small business,” “cheapest option,” and so on.
- I ran every prompt five times per engine and averaged the results, because AI answers shift from one run to the next. A single query tells you almost nothing.
How I Scored It
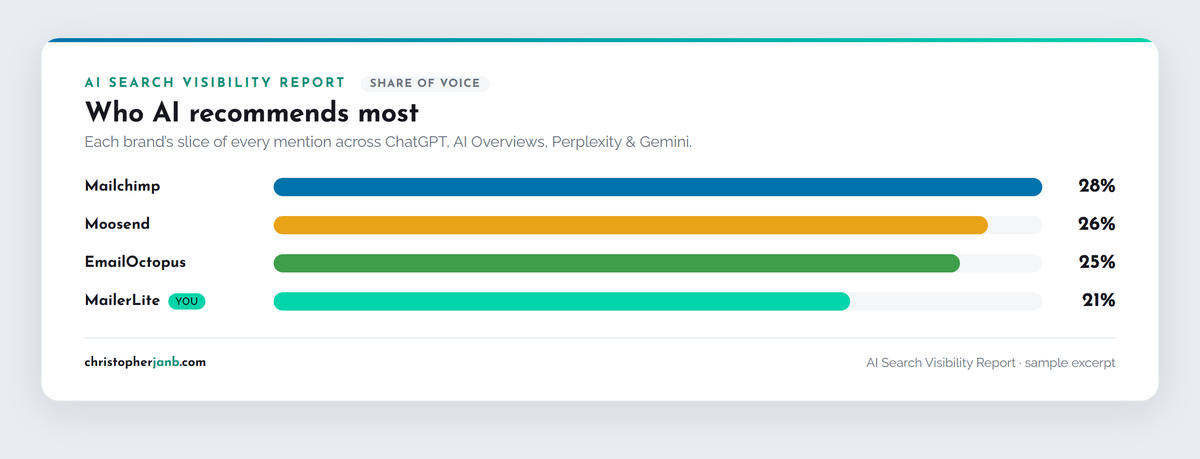
For each answer, I recorded which brands got named and which got cited with a link. Then I rolled it up into share of voice: each brand’s slice of all the mentions across every prompt and engine. Higher share of voice means AI put that brand forward more often. This is the same method behind my AI Search Visibility service, pointed at a public test instead of a client.
Step 1: The Google Rankings Were Not Close
Ranked by estimated organic traffic and page-one keywords, the four sat in a clear order:
- Mailchimp was in a different league. Around $745K in estimated monthly search traffic value and roughly 12,600 keywords on page one. It laps the field.
- MailerLite was a clear second, with strong page-one presence and about 1,150 keywords up top.
- Moosend came third. It ranks for plenty of terms, but most of them sit on page three and deeper.
- EmailOctopus was last and smallest, with a fraction of the group’s search footprint.
MailerLite had roughly seven times the search presence of EmailOctopus. In Google terms, it wasn’t a fair fight. If SEO decided AI visibility, MailerLite should have crushed the two smaller brands in the AI answers too.
Then I asked AI, and the fight changed completely.
Step 2: Then I Asked AI, and the Order Flipped
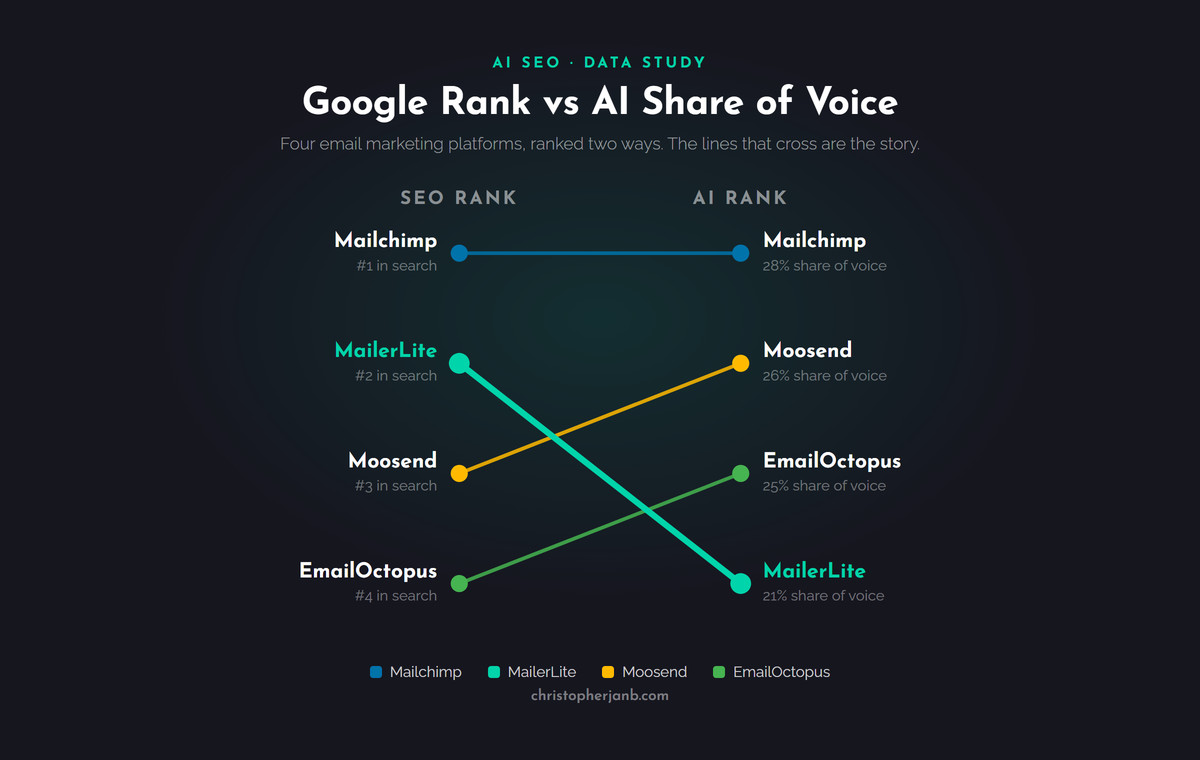
Here’s the AI share of voice next to the SEO ranking. The two columns are the whole story.
| Brand | SEO rank (Google) | AI rank (share of voice) |
|---|---|---|
| Mailchimp | 1 | 1 (28%) |
| MailerLite | 2 | 4 (21%) |
| Moosend | 3 | 2 (26%) |
| EmailOctopus | 4 | 3 (25%) |
Mailchimp held the top spot. Below it, everything reshuffled, and it reshuffled in exactly the wrong direction for anyone who thinks SEO decides this.
MailerLite Ranked #2 on Google and Finished Last in AI
The strongest challenger in search came dead last of the four in AI answers. Second in Google, fourth in AI. All that ranking strength did not carry over.
EmailOctopus Punched Far Above Its SEO Weight
The weakest platform in Google, with about a seventh of MailerLite’s search footprint, got recommended more often by AI. On paper it should have been an afterthought. In the answers, it wasn’t.
What the AI Answers Actually Showed
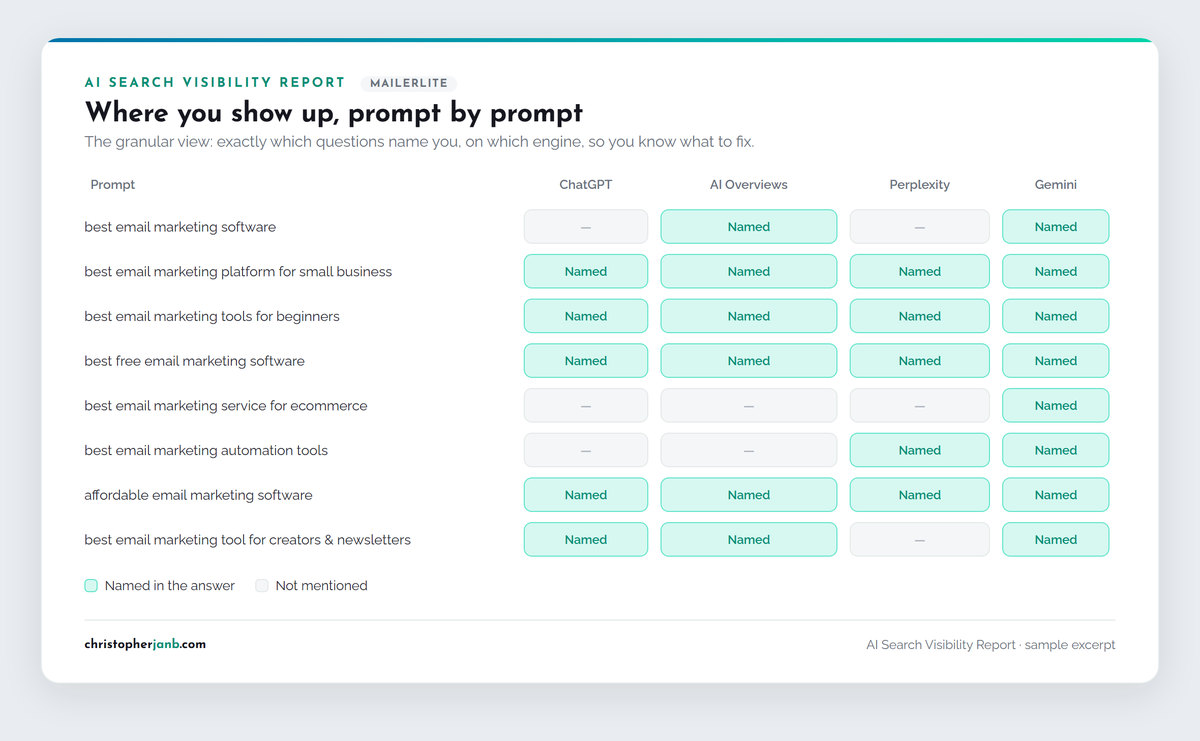
Share of voice is the summary. The individual answers are where it gets concrete, and a few of them made the pattern impossible to ignore.
- On “best email marketing software,” the biggest query in the set, ChatGPT and Perplexity both left MailerLite out completely. They named Mailchimp, Moosend, and EmailOctopus, and skipped the one challenger with the strongest Google rankings. Only two of the four engines mentioned MailerLite at all for that query.
- On “best email marketing service for ecommerce,” three of the four engines did the same thing. ChatGPT, AI Overviews, and Perplexity each named EmailOctopus, the weakest platform in search, and none of them named MailerLite. Gemini was the only engine that included it.
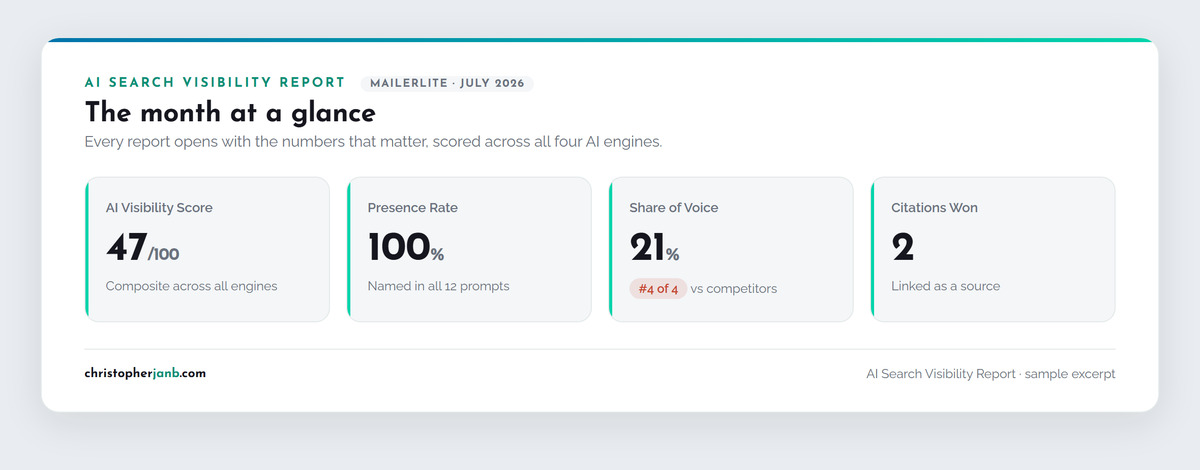
- The citations told the same story. When an engine backed a brand with a source link, Moosend got cited seven times across the test, more than Mailchimp’s four. MailerLite, second in Google, was cited twice. EmailOctopus was named plenty but rarely linked, which is its own gap to close.
The platform with the second-best SEO in the group kept getting left out of the exact answers it should have owned, while weaker-ranked competitors got named and linked in its place.
There’s one more detail worth sitting with. MailerLite showed up in all 12 prompts somewhere. The models clearly knew it existed. They just almost never put it forward as the answer. It was in the room the whole time and rarely got picked. That gap between “known” and “recommended” is the whole problem in one brand.
So Does Good SEO Mean Good AI Visibility?
On its own, no.
The only place the two rankings agreed was the very top, and Mailchimp is a special case worth calling out.
The Only Agreement Was at the Top, and That’s Brand, Not SEO
Mailchimp is the name half the market already knows. Its brand sits in the training data, in the reviews, in every “best email tools” listicle. That kind of dominance shows up everywhere, in Google and in AI, and it says more about scale and reputation than about any single ranking. Take the giant out of the picture, and the link between ranking position and AI visibility falls apart.
Google and AI Answer Different Questions
- Google ranks your page against a search. It rewards relevance, links, technical health, and your position for a keyword.
- AI isn’t ranking your page. It’s assembling a recommendation, and it builds that from what it can find said about you across the web: third-party lists, reviews, comparisons, and the words other people use to describe your product.
Ranking well means your page is strong. It doesn’t mean the wider web talks about you like an answer. AI leans on the second thing, which is why content that earns mentions and citations matters as much as on-page ranking now.
Being Present Is Not Being Preferred
MailerLite is the whole lesson. It ranks well. It gets crawled. AI knows it’s there. And it still isn’t the name handed to the buyer. Ranking earned it visibility. It didn’t earn it the recommendation.
What This Means for Your Brand
Ranking in Google is necessary. This test is a blunt reminder that it isn’t sufficient. A few takeaways if you’re serious about AI search:
- Don’t treat your rankings as proof of AI visibility. For most brands, the two don’t move together, and the gap is invisible until you measure it.
- Measure both, separately. Your Google positions and your AI share of voice are different scoreboards. Track them as such.
- If you’re not the category giant, do the AI work on purpose. Brand fame carries the leader into both channels. Everyone else has to earn AI visibility deliberately.
How to Check Your Own AI Visibility
You can’t fix what you haven’t measured. The starting point is a baseline: where your brand actually shows up across ChatGPT, AI Overviews, Perplexity, and Gemini, and where competitors are getting recommended instead of you. That’s exactly what my AI Search Visibility service does, using the same method you just read. If you’d rather start with the fundamentals, a technical and content SEO audit is still the foundation everything else sits on.
The Honest Limits of This Test
I’d rather you trust the direction than oversell the certainty, so here are the caveats:
- This is one category over one month. A different niche could behave differently.
- AI answers are non-deterministic. They shift from run to run, which is why every prompt ran five times and got averaged.
- Share of voice is directional, not a fixed ranking. It shows a trend, not a guarantee.
It’s a direction, not a law of physics. But the direction here is hard to miss.
FAQ
Does SEO still matter for AI search?
Yes. Strong SEO gets your pages crawled, indexed, and treated as credible, which keeps you eligible to appear in AI answers. This test shows it isn’t enough on its own, but it’s still the foundation. Think of good SEO as necessary but not sufficient.
What is answer engine optimization (AEO)?
Answer engine optimization is the practice of getting your brand named and cited in AI-generated answers, from ChatGPT to Google’s AI Overviews, rather than only ranking in the traditional list of blue links. It’s sometimes called generative engine optimization (GEO).
Why does a lower-ranking brand show up more in AI?
Usually because the wider web talks about it more in the contexts AI pulls from: third-party best-of lists, reviews, and comparisons. AI builds recommendations from what’s said about a brand across the web, not only from who ranks highest for a keyword.
How do I find out where my brand stands in AI search?
Run a baseline across the major AI engines for the questions your buyers actually ask, and compare your share of voice to your competitors. That’s what the AI Search Visibility service measures, and it’s the fastest way to see the gap between your Google rankings and your AI visibility.