
Writing blog posts is never just about the writing process. Quote me on that!
They are other things you must do before and after writing it to ensure that your audience gets to read it, if you targeted the right audience, that is!
By I’m getting way ahead of myself. Let’s start from the very beginning, which is what this post will be about:
- Learn how to research article topics for your new blog.
- Prepare how you plan to write the blog post.
- Write the most successful blog post possible (wild that it’s the third topic about how to write a blog post, but there’s a reason for this—read on to find out why)
- Edit your post before publishing it on your own blog.
- Promoting your blog post to maximize reach
These points are simple enough to understand but tricky to execute. Let’s begin with the first:
Blog Research
Knowing where to write your blog post enables you to produce the best content.
And since not all blogs are the same, you need to profile each first to help you better understand the blog. This is important if you’re juggling different blogs you own or work for clients.
Below are steps you must include in your blog research process.
Determine the Blog’s Niche
We can categorize niches into two categories: blogs targeting customers (B2C) and those targeting businesses (B2B).
You’ll most likely be working on B2B blogs for clients. Examples of these blogs target big companies looking for enterprise solutions.
Unlike B2B blogs, B2C blogs are geared toward individuals that meet the company’s buyer persona. Niche sites promoting Amazon products are perfect examples of this blog type.
However, what truly matters is the niche of the blog you’re working on.
A niche requires specific knowledge from a writer to produce content guaranteed to satisfy their audience. Some niches like finance and medicine have a higher barrier to entry to create good content.
While they may pay more for their content, they are much more demanding concerning their quality
Other niches are much easier to write about due to their practical nature.
For example, while having accreditation as a fitness instructor helps with blogging, you don’t need one. You can draw from your experience as a fitness enthusiast to produce valuable content that resonates with readers.
If you’re unfamiliar with your client’s blog or site’s niche, you need to brush up on your knowledge of who the brand caters to.
To do this, use a tool like Ubersuggest that identifies the top-ranking pages of a domain.
From the site, enter the domain URL and see the other information about the site, such as traffic estimates, keyword opportunities, and others.
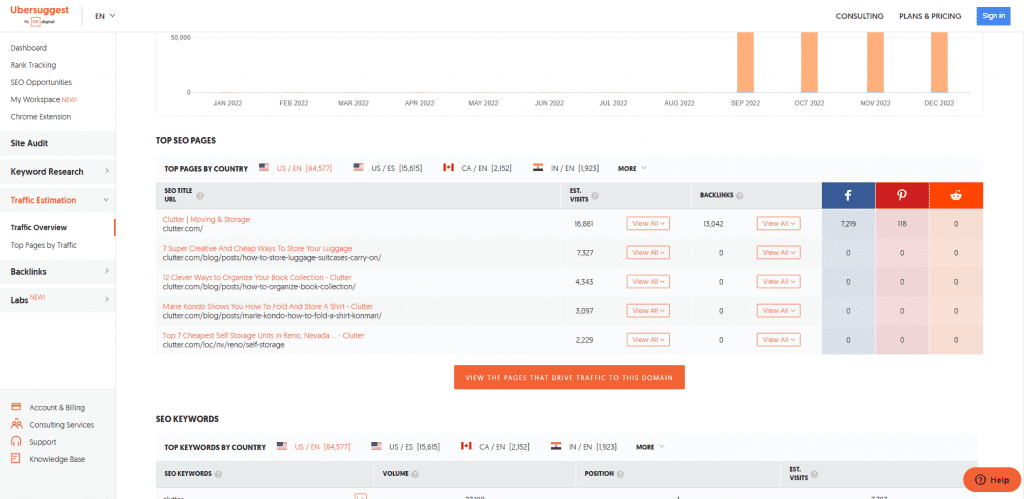
In the example above, the pages driving the most organic website traffic target informational keywords. They are helping customers in the B2C space by covering moving and storage topics.
From here, you must orient yourself to writing for the B2C space about similar topics as its top-ranking pages.
At the same time, you’ll know your style and approach when writing your blog post.
While there are arguably better tools than Ubersuggest, its free account lets you get a snapshot of a website faster than any tool out there.
Know Its Goals
A blog is a marketing tool that eases your audience down your marketing funnel using your published content. Whether you use it to inform your audience about a topic or for guest blogging (yes, it still works), writing has a place in your marketing strategy.
It is part of effective content marketing that leverages content across various platforms (including social media, email, and others) to get them to commit to your call to action.
Since a sales funnel has various stages, you must produce quality blog posts that align with the stage in the sales funnel the blog is in.
For some businesses, blogging is in the ToFu (top of the funnel). That means people in this stage aren’t aware that the business exists. Using your blog posts, you educate them about the business by writing helpful information designed to build trust with people.
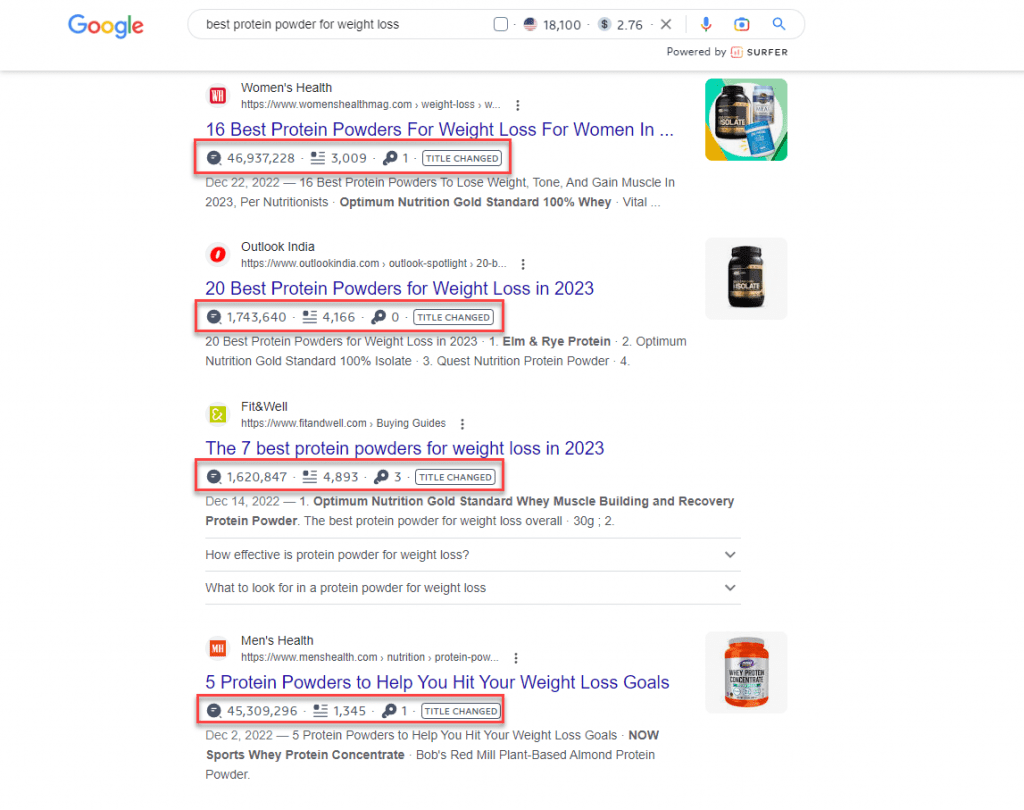
Examples of blog post topics in the ToFU are those that ask questions.
You can find examples of these topics on the Google search engine results pages (SERPs). If you enter a query a generic query (“making coffee,” in this example), you can find a section on the page that lists questions people ask about it:
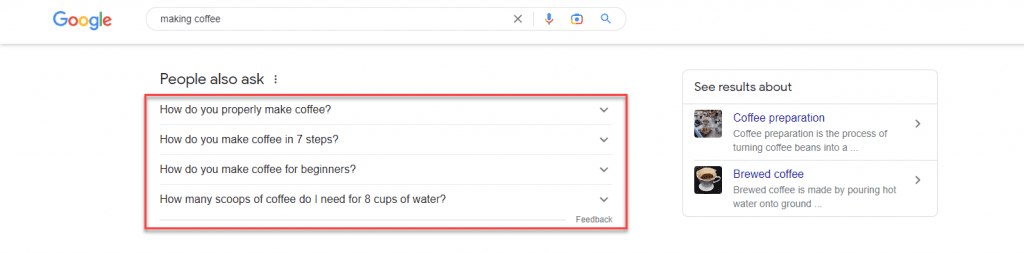
If you click on one of the questions in this section ( the “People Also Ask” section), it shows you the answer snippet to the question AND two additional questions related to the one you clicked.

You can use the questions here as topics for your next blog post and for the other articles you’ll be writing!
Others use blogging at the BoFU (bottom of the funnel). People in this stage know about your products and services but are still deciding whether to purchase them from you. In this case, your blog posts must showcase your products to help them make informed purchasing choices.
BoFu blog post content teaches its audience how to use the product or service correctly.
Most businesses utilize blogs to cover both stages in the sales funnel. By creating blog posts that help establish their authority to your client’s audience and inform them how to use your products, you guide them to become blog visitors and, ultimately, customers.
Hubspot is a brand that has its content marketing funnel down to a tee.
If you’ve searched for anything related to digital marketing, there’s a big chance you’ve seen one of Hubspot’s posts ranking on top of SERPs.
While these are ToFu posts ranking on Google, Hubspot has covered the digital marketing topic with posts on search engines.
And once you’ve clicked on one of their pages, you will see a content upgrade dangling in front of you like a carrot tied to a fishing pole.
In the example below, the post about target personas features a template that users can download.

But before you can download the resource, readers must first give Hubspot their names and email addresses.

While Hubspot uses the information to send you the template securely, it also sends you marketing emails about its products and services.
While this sophisticated marketing approach may be above your pay grade, for now, it’s essential to understand that the content you’ll write for clients or your blog isn’t just limited to blog posts.
In some instances, you may be assigned to create these written templates yourself.
As a blogger, your client may assign you to write blog posts covering different topics. But if clients ask you to brainstorm for topic ideas, knowing the blog’s primary goal as a marketing tool makes determining whether to target ToFu or BoFu topics much easier for you.
But we’ll cross the bridge when we get there. We’ll discuss the topic and keyword research later once you start writing the blog post.
Find Its Audience
We’ve already discussed writing for an audience to get more people to engage with your blog post. And you can only achieve this by knowing them to the fullest extent.
To do this, you must create a buyer persona, a fictional persona based on your ideal customer. You should be able to develop a persona based on market research and the data you have on your existing customer base.
Your personal should include the following:
- Demographics
- Behavioral patterns
- Motivations
- Goals

You can write a blog with detailed buyer personas that cater directly to their needs.
For example, take a look at Sharable for Hire’s blog. As a company specializing in employee background checks, they know their customers are businesses looking for a more direct recruitment and hiring process.
Their blog covers topics from finding the best candidates to retaining them.
Knowing your audience’s demographics helps you determine how to present your content.
If you have access to the blog’s Google Analytics, you can access your audience’s demographics. Check where most of your visitors are coming from, what devices and browsers they use, and other information to help build your buyer persona.

For those using Google Analytics 4, you can click on Reports > Users > Demographics > Demographics overview. It shows you a snapshot of your visitor’s demographics based on location, interests, devices used, and more.
From here, you can use this information to help you write your posts moving forward. If most of your visitors are from the US, you need to brush up on your knowledge of US culture and language. This way, you can develop a writing style that resonates with them.
If the blog is new, it probably doesn’t have enough visitors for you to see its demographics. In this case, it’s best to ask the blog owner who they want to target with their blog.
Find Your Voice
Your buyer persona will impact your brand voice, the tone, and the style in which you write the blogs that allow you to appeal to your audience.
You do this in your everyday life when talking to different people. For example, when talking to your grandma, you have a different voice than your friends. Based on the information in your buyer persona, you’ll need to determine whether your voice is:
- Formal
- Funny
- Casual
- Authoritative
Essentially, you’ll need to determine if you want to sound like a knowledgeable and helpful friend or an authority.
However, you should never take on a voice that might seem false. For example, you shouldn’t be formal like another brand. Instead, you can be a standard version of your existing brand.
One of the better examples of writers who has a good grasp of their writing skills is Neville Medhora.
He’s a former copywriter for Appsumo and owns the Copywriting Course.
Even if you aren’t a member of his course yet, his blog posts give you a taste of his distinct writing voice.
Case in point, his “How To Become A Life Coach” LinkedIn post:

The post is quite obnoxious-It could even rub off people the wrong way,
However, he uses these qualities in his writing to great effect. He’s able to communicate his ideas more effectively to his audience by harnessing his humor and writing voice.
Overall, the audience wants the blog to be authentic and unique rather than something generic.
You don’t want to sound just like any other writer out there. So, by drawing from your wealth of experience intertwined with your personality and sincerity, you can cut through the noise and produce content the way you’re meant to.
Blog Content Research and Planning
The easiest way to waste time and hard work are to commit to writing a post before you know how valuable it will be.
Brainstorm for Topics
If your client provides you with blog topics to write, feel free to skip this post.
However, I suggest you at least browse through it—you’ll never know if the client wants input on which topics to write about.
Knowing your blog’s niche lets you narrow the scope of topics to suggest. But the goal here is to provide topics the blog hasn’t covered.
There are many ways to brainstorm for topics, but below is what I find the most effective.
To see what these topics are, head on to Google search and type the following:
site:[blog URL]
Replace [blog URL] with the blog’s address.
This search operator will show you published blog posts on the blog indexed by Google.
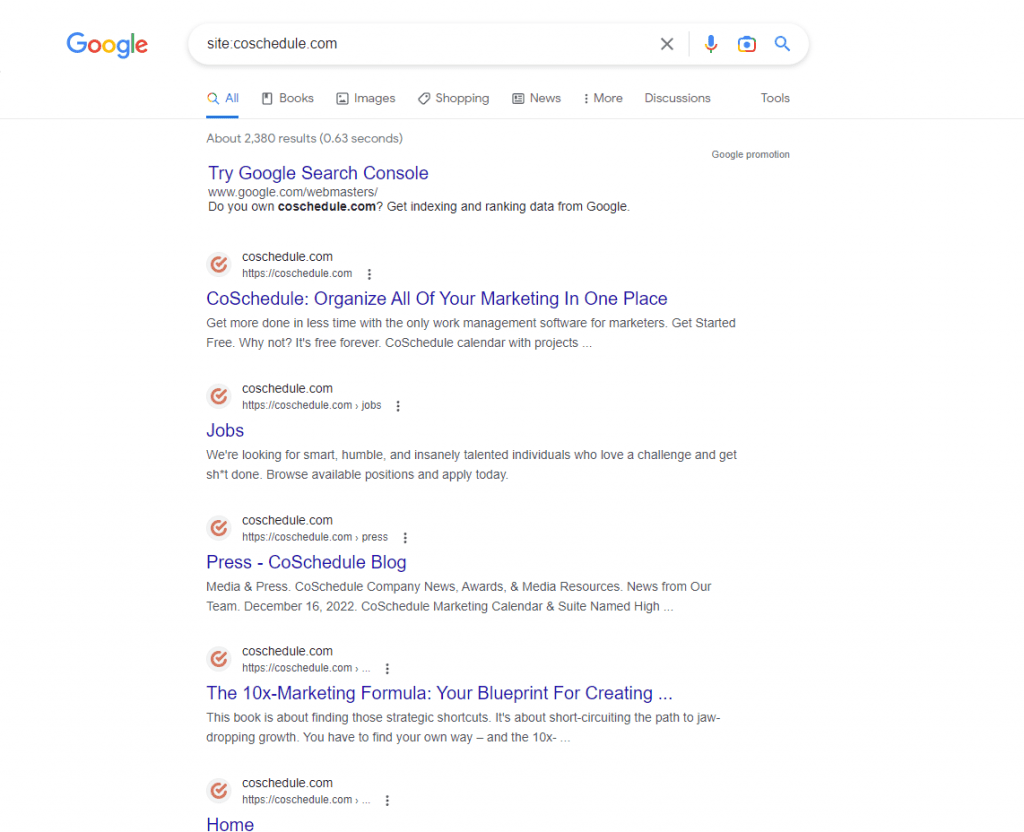
From here, visit each page and look for external or outbound links, i.e., links that point away from the site.
If there are external links on the blog posts, it’s probably because the blog doesn’t have a published article about that topic yet.
That’s already a potential topic you can suggest to your client!
You can do this on all the blog’s indexed posts to unearth more blog post ideas.
The logic of suggesting these topics is that the blog owner can link to this post instead of from a third-party site. This way, the blog gets to keep its link equity, which is what search engines use to determine a site’s authority.
The more outbound links your blog has, the more “authority” escapes from it, and the less likely it’ll rank for its target keywords.
Creating content for these topics incentivizes the blog to sustain its link equity for higher rankings on Google.
Do Keyword Research
Once you have a batch of topics o write about, you must perform keyword research for every potential post you brainstorm.
The goal is to maximize your blog post’s visibility on search results. You want to target keywords that most of your audience searches for and have the least competition.
For this, you’d need a tool to show you a search term’s estimated monthly search volume.
Personally, the most accessible keyword tool to use for free is Keyword Surfer.
It’s a Chrome extension created by Surfer SEO to help you identify the search volume of each term on SERP.
After installing and activating the extension, type the topic on the Google search bar.
On the search engine results page (SERPs), a sidebar will appear showing you keyword suggestions related to the topic, the search volume of each, and its relevancy.
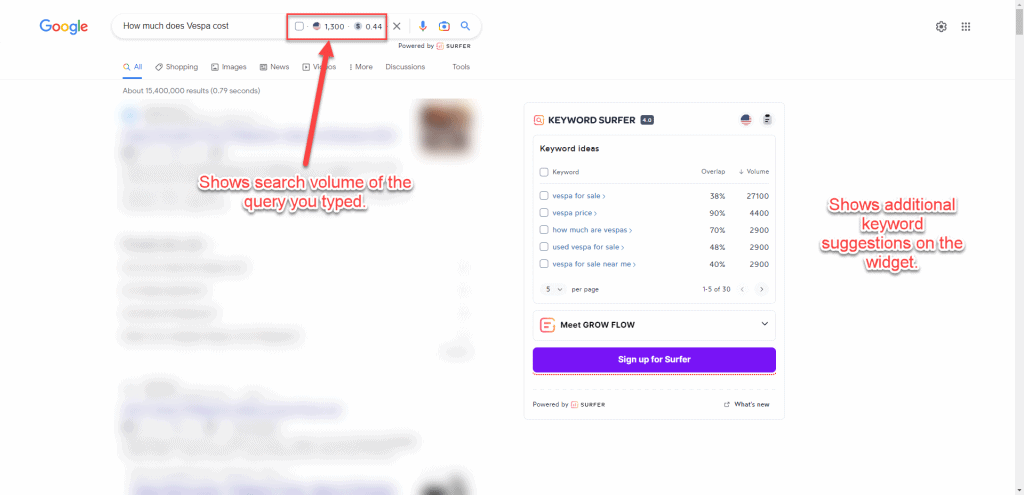
From the results, you can also see the estimated volume of traffic the blog domain receives, the number of words on the page, and the number of times the search query was mentioned.
Based on these factors, you can choose the appropriate keyword to target for your blog content.
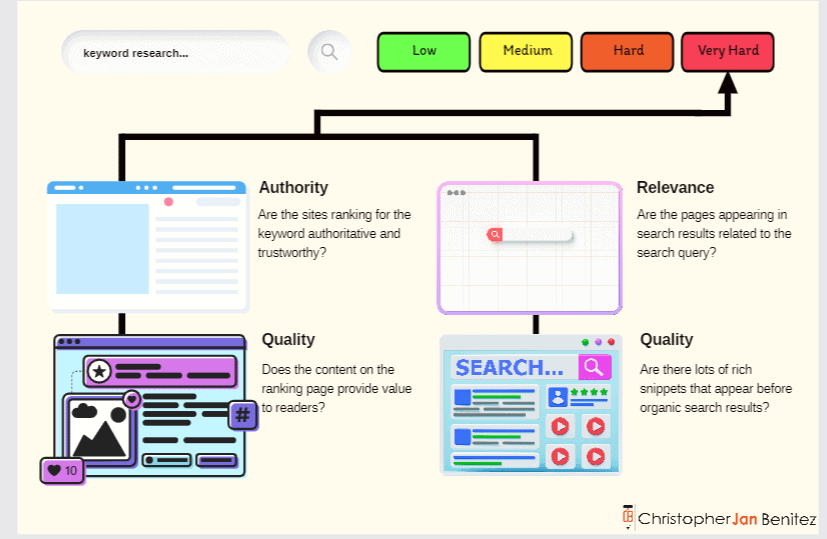
However, you shouldn’t always target keywords with the highest search volume for your content. You also must take into consideration the difficulty of ranking for them.
Keyword difficulty is a score assigned by premium keyword tools to determine the likelihood of ranking your content on top of search results.
The lower the score (on a scale of 0-100, 0 being the lowest), the higher your post’s chances of ranking for it.
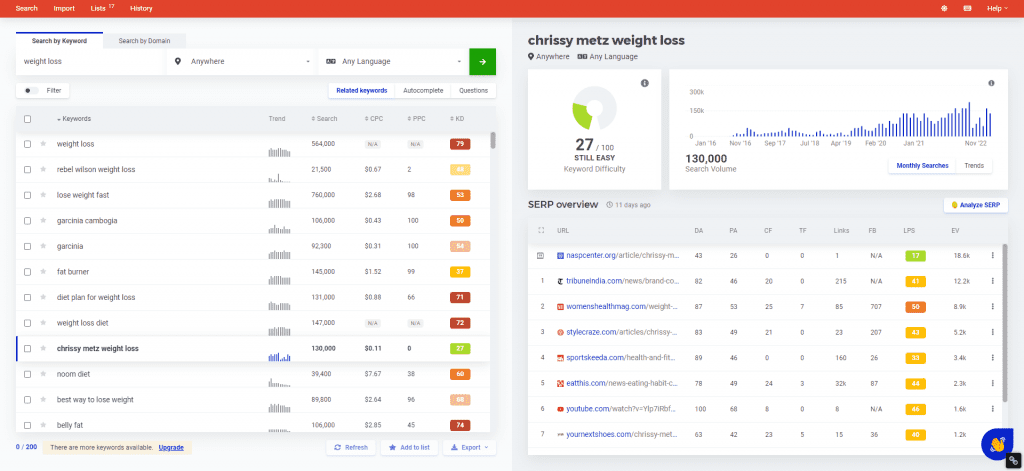
This metric isn’t available on free keyword research tools, and those that do offer it have limitations or don’t provide accurate data. So you’ll have to resort to using a paid tool like KWFinder.
It has a reliable keyword difficulty score that you can factor in when deciding which keyword to target for your blog post’s topic.
You can also conduct competitive keyword research using the tool. Enter the domain URL of a competitor or a site that covers the same topics as your blog. KWFinder will show you keywords the site is ranking for, which you can use as topics for your upcoming posts.
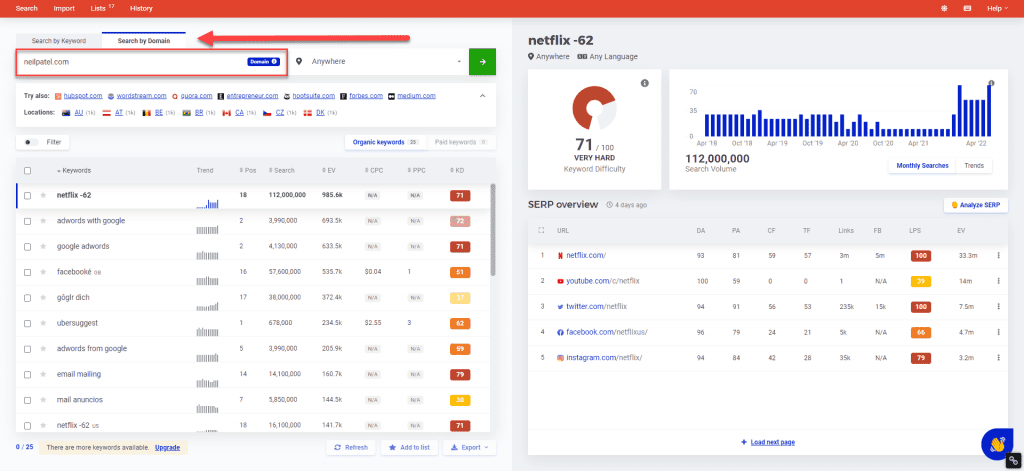
But before using these keywords, ensure that your blog hasn’t covered them yet.
Determine Intent
Now that you’ve determined the keywords for your blog posts, it’s time to figure out the intent for each.
Back then, when Brian Dean’s “Skyscraper Technique” was in full force, publishers were writing exhaustive pieces about the topic. They cover the full spectrum of a topic and reach at least 4,000 words each.
This is what worked then because Google ranked these pages like crazy.
However, the search engine’s algorithm constantly changes, and it’s decided that intent is more important.
For example, if people search for “social media tactics,” the assumption here is they want to know the best social media techniques for building an audience on various channels.
They don’t want to know the history of social media, its different channels, or who the best people to follow on social media are. It’s because these topics are not implicit in the keyword’s intent.
So, by determining why the user typed in their search query, you can figure out what to write in your blog post to provide them with the necessary information.
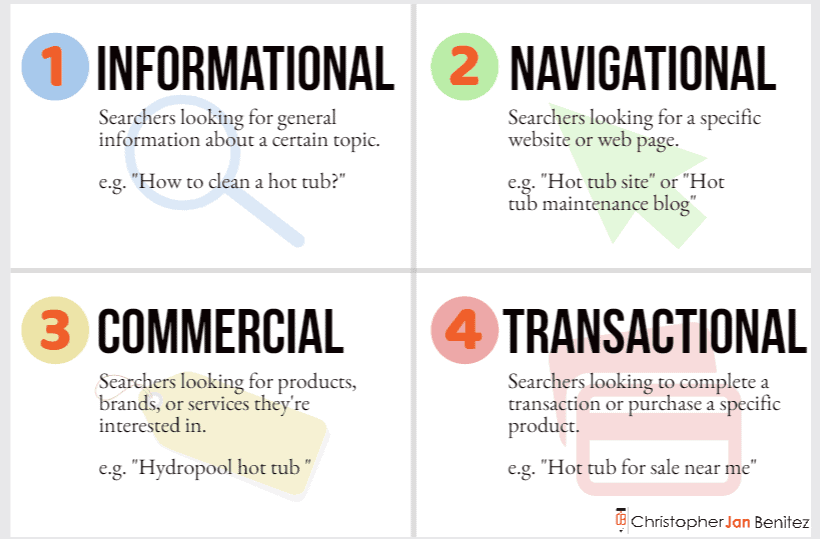
There are three user intents you must know:
- Navigational – Looking for a specific company or brand website page.
- Informational – Looking for answers to questions about a site’s topic or niche.
- Commercial/Transactional – Looking to make a purchase or information that will help them make a purchasing decision.
In some cases, the intent is evident in the keyword.
If the search query begins with any of the four W’s (what, why, when, where) or 1 H (how), its intent is informational.
But a question query can have a commercial intent if it involves pricing, ex. How much is x, and what is the price of x. Since users want to know the price of a product, there’s a good chance they’re interested in making a purchase.
So, instead of guessing, you must determine for sure what intent your topic has.
To help you find the intent of a keyword, go to Google and type the keyword on the search bar. Then see the top pages appearing on search results.
If most pages answer a question or problem, then the keyword likely has an informational intent.
But if the results are reviews, alternatives, or comparisons to other products and services (all of which are helping users make a purchasing decision), the keyword has a commercial intent.
Doing the above process takes time, however. So, a faster way to determine user intent is to use a tool like SEMrush that shows you the intent of a keyword and its related terms.
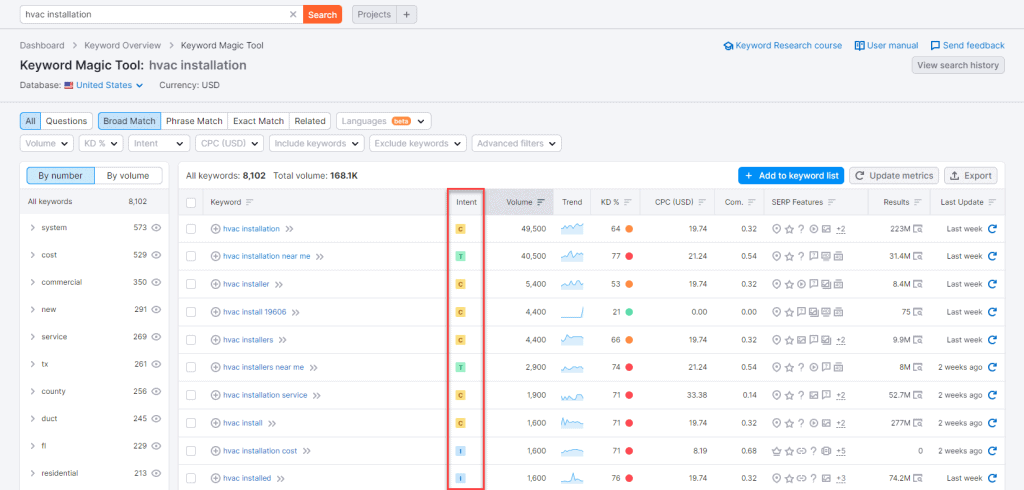
While it’s best to manually check for the posts to determine intent, using tools helps expedite the process and improve your writing workflow.
Write Your Outline
Outlining is one of the unsung heroes of content writing. You can’t create good content if you don’t have a structure before writing it.
You’ll find yourself going back and forth between writing and researching and back, which makes the process much longer for you.
To hasten the process, you must write outlines before creating the content.
The article should contain the talking points and research materials you must mention. This way, you have everything you need to write the article so you can focus all your energies on it.
You can do this manually by taking the top-ranking pages and analyzing their h2s. We want to take the most relevant and standard h2 these posts have and include it in ours.
To help you with this process, use the Detailed SEO Chrome extension. Click on it from your extensions when you’re on the page you want to analyze.

Do this on all your top-ranking competitors and compare which headers they share the most.
The goal is to incorporate these headers in your content to make it familiar enough for search engines to rank your page higher than before.
Pick which h2 and other subheadings work best with your writing piece. Include bullet points for each subheading that you’ll flesh out once you start writing.
Aside from doing this manually, you can use Contentpace to help you drag and drop subheadings that you want to add to your article.
It’s a content writing research tool that helps you pull out headers (H1, H2, etc.) of each ranking page.
From here, you can drag and drop the headlines you wish to include in your article.
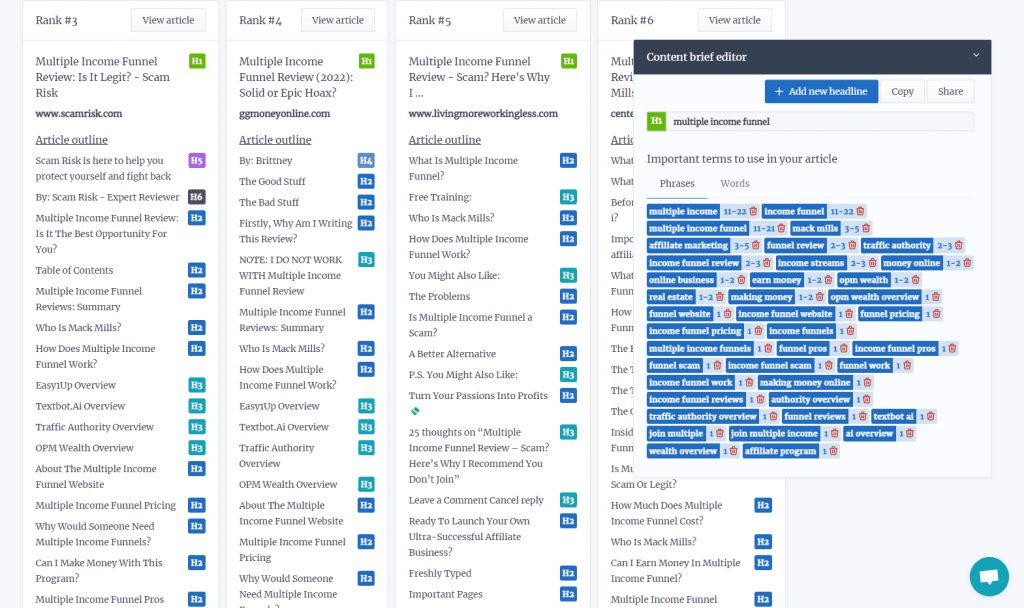
Then add notes on the outline to help you keep tabs on what you’ll write once you start with the article.
Contentpace also shows you averages of the top-ranking pages for your keyword.
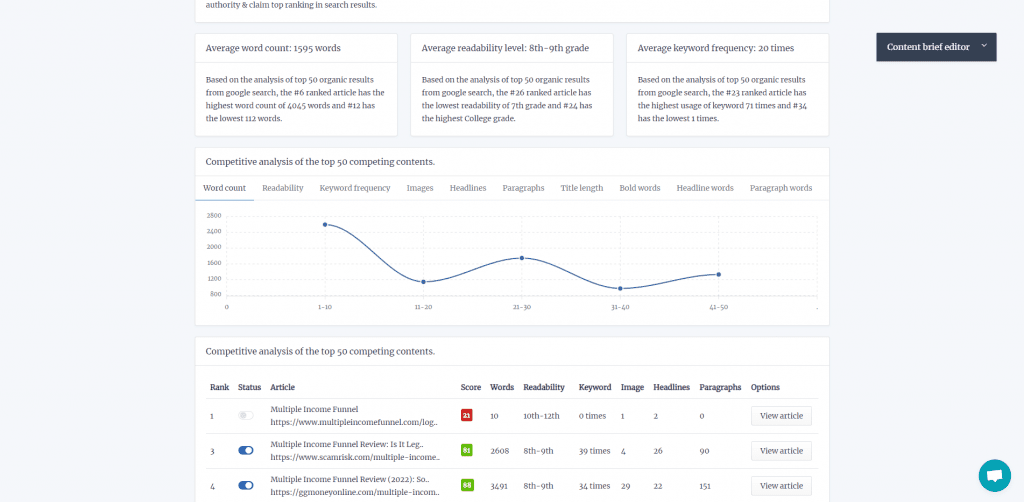
This helps you write a certain number of words in your article, readability score, and keyword frequency to match those appearing on SERPs’ first page.
Split your post over three days
After conducting blog research, you can break down the following tasks into these steps:
- Research
- Writing
- Editing
You can split these tasks into three days across all the articles you need to write in a period. This is a method I learned about on Buffer’s blog, and it’s served me well ever since.
Considering that all posts will take at least three days, make up for it by working on three daily posts.
- Day 1 – research information for the first article, edit the second article and begin writing the third article.
- Day 2 – Write the first article, research information for the fourth article, and edit the third article.
- Day 3 – edit the first article, begin writing the fourth article, and research information for the fifth article.
Writing articles this way allows you to compartmentalize articles into digestible tasks that you can complete in increments.
Writing takes a different mindset to research; anything you learn will need to sit in your head for a while to be processed to make any decent points.
That’s why you must research first and get all the information you need to write the content much faster and more efficiently using your skills or various tools.
I’m not saying that you shouldn’t write anything during research—make notes and record valuable sources you can link back to or quote.
But don’t attempt to write any of the actual text. If you do, you’ll find yourself flip-flopping between researching and writing, and those three hours will be up before you finish the first draft.
Similarly, never edit a post while you write it. Again, doing so shatters any flow to your writing to the point where you’ll lose focus and inevitably struggle to keep up the pace.
By splitting up your writing flow this way, you’re allowing your mind to all three processes to write better and get some distance to edit effectively.
Predict How Long You’ll Complete Each Task
Knowing how long to spend on the various parts of writing a great blog post was difficult at first. It’s different for everyone and from post to post.
In general, however, you want to limit yourself to spending an hour each researching and editing your content.
This puts more of a concrete limit on how much time you have for a given task, which helps you to focus and make every second count.
If you know that you only have one hour to research everything you need to know to make your blog post as good as it can be, you’re inherently less likely to stray off on tangents on the off chance that you’ll find an interesting tidbit.
Writing a blog post varies depending on the topic’s word count and complexity. I see myself spending more than two hours writing a 1,000-word blog post.
Remember, the goal here isn’t to be as fast as possible. Spending more than two hours (or even less) writing the post is okay.
It’s to produce good content in short bursts consistently. Having concrete deadlines for each part of the writing process allows you to do that.
Blog Content Writing
Now we’re into the writing tips themselves.
At this point, writing should now be a breeze—you have researched everything to ensure that your piece will have all the information it needs to provide value to readers.
It’s just a matter of putting everything together in a cohesive, well-thought-out, and well-written piece.
Here’s an infographic of the things you must keep in mind when writing your blog post:
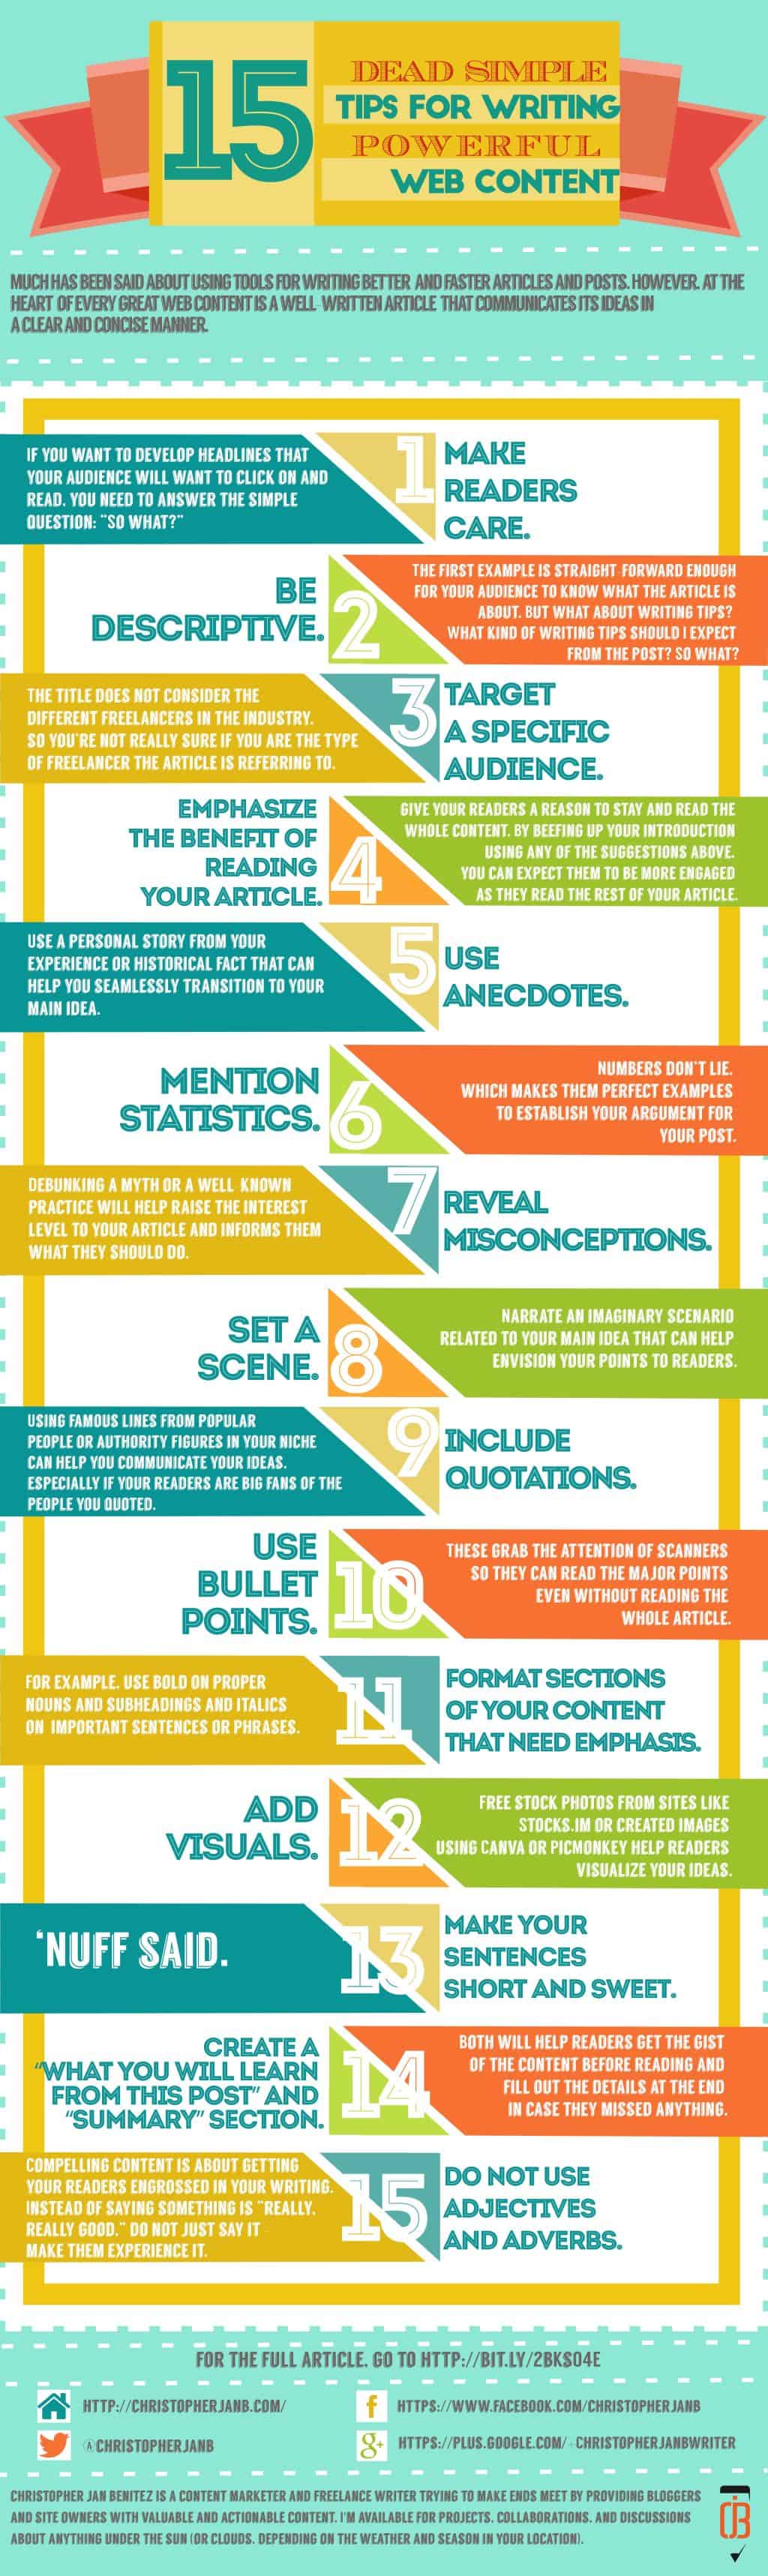
Now, let’s discuss each one below:
Compelling headlines
The headline is the first thing your audience will see in your post, whether it’s shared on social media or appears on search results.
Regardless, you want your headlines to be solid and robust enough so that people will be compelled to click on them.
Below are ways you can do this:
Make readers interested
If you want to develop a post title that your audience will want to click on and read, you need to answer the simple question:
“So what?”
Consider the following examples as blog titles:
- Writing Tips for Freelancers
- 8 Easy Writing Tips that Freelance Ought to Follow
- 8 Easy Freelance Writing Tips That Will Keep Your Clients Happy
Which one is the most effective among the three listed above?
Be descriptive
The first example is straightforward enough for your audience to know the article.
But what about writing tips? What kind of writing tips should I expect from the post? So what?
If you’re having problems fleshing out details in your content, there are blogging tools that can help you get the job done.
Emphasize the benefit of reading your article
The third example is not only descriptive, but it also tells what kind of freelancers the article is for. If you are having trouble retaining your clients, the tips will help you solve this problem.
You can read the article by clicking here!
Use intro sections as hook, line, and sinker

Your introductory paragraph is a way to draw your readers to your article. Writing a weak one will force them to stop reading. Therefore, give your readers a reason to stay and read the whole content.
By beefing up your introduction using any of the suggestions above, you can expect them to be more engaged as they read the rest of your article.
Use Intro Frameworks
Taking a cue from this post at Bid4papers, below are ways that you can write an exciting introduction to your article:
Tip # 5: Use anecdotes. Use a personal story from your experience or historical fact that can help you seamlessly transition to your main idea.
Tip # 6: Mention statistics. Numbers don’t lie, which makes them perfect examples to establish your argument for your post.
Tip # 7: Reveal misconceptions. Debunking a myth or a well-known practice will help raise your article’s interest level and inform them what they should do.
Tip # 8: Set a scene. Narrate an imaginary scenario related to your main idea that can help envision your points to readers.
Tip # 9: Include quotations. Using famous lines from popular people or authority figures in your niche can help you communicate your ideas, especially if your readers are big fans of the people you quoted.
Make it easy to understand your point

The Nielsen Norman Group reported that users don’t read content on the web. Instead, they scan for keywords and phrases that grab their attention.
Instead of bloating your article with more words, you need to…
Simplify your content so readers will quickly scan the words they are looking for in your articles.
“How,” you ask? Simple:
Tip # 10: Use bullet points. These grab the attention of scanners, so they can read the major points even without reading the whole article.
Tip # 11: Format sections of your content that need emphasis. For example, use bold on proper nouns, subheadings, and italics on basic sentences or phrases.
Tip # 12: Add visuals. Free stock photos from sites like Pixabay, Pexels, or creating images using Canva or PicMonkey help readers visualize your ideas. Depending on your audience, you may want to add visuals to your blog that enhance and make it more appealing. For example, if your blog is about how to crochet, adding images of each step can add value by showing them how it’s done instead of telling them.
Tip # 13: Make your sentences short and sweet. ‘Nuff said.
Tip # 14: Create a “What You Will Learn from This Post” and “Summary” section. Both will help readers get the gist of the content before reading and fill out the details at the end in case they missed anything.
Tip # 15: Do not use adjectives and adverbs. Compelling content is about getting your readers engrossed in your writing. Instead of saying something is “really, really good,” do not just say it – make them experience it. Describe the feeling of goodness so readers can relate to it more personally.
Optimize, Optimize, Optimize!
We would be remiss if we didn’t discuss search engine optimization (SEO) in content writing.
In a nutshell, SEO is the process of getting your blog post to rank for its target keyword on organic search.
The higher the post ranks on search engines, the more clicks it’ll get from search results.
In the latest data from Advanced Web Ranking’s Google Organic CTR History as of November 2022, the first place receives almost 40% of clicks, while the second and third places receive 15% and 9%, respectively.

Let’s say that the keyword you’re trying to rank for has an estimated 1,000 search volume, here’s the number of monthly clicks you’ll receive from ranking at the first three spots:
- #1 – 400 clicks (1,000 * 0.4)
- #2 – 150 clicks (1,000 * 0.15)
- #3 – 90 clicks (1,000 * 0.09)
So, to write content that ranks at the top of SERPs, you must observe the best on-page SEO tactics.
The two things you can do as a content writer to achieve this are the following:
- Mention your keyword on the page’s H1, SEO title, and meta description (also known as the three kings of on-page SEO)
- Use SEO content writing tools to help you understand how optimized your content is based on various factors.
Regarding the latter, I highly recommend Surfer SEO as your SEO content tool of choice.
It has a very robust Content Editor that lets you optimize content for multiple keywords (up to 20). It then pulls up natural language processing (NLP) keywords you must mention in your content.
The goal is to make the score as high as it can be. Anything above 66 shows green, which means it’s optimized enough but feel free to go beyond that number, especially if it makes your content read better.
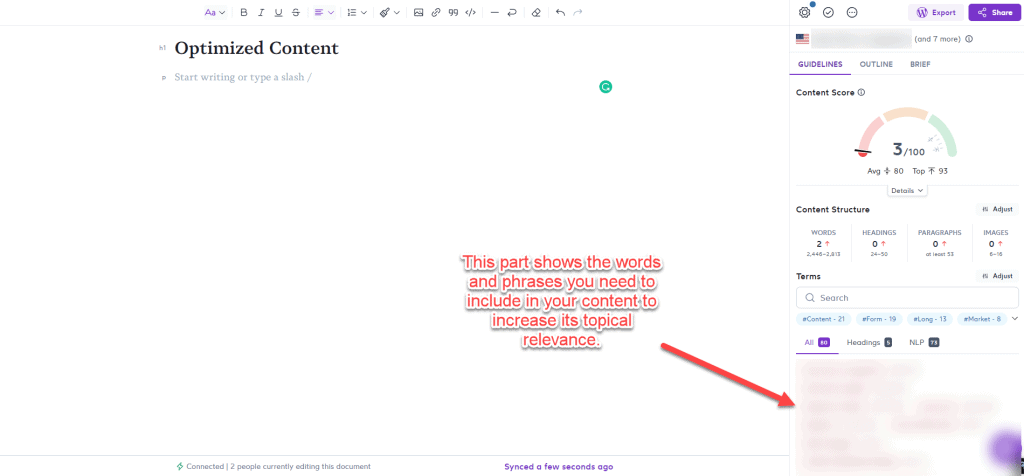
Doing so allows you to create blog posts topically relevant to their respective keyword.
This makes Google’s job of understanding what your content is about much easier, thus increasing your chances of ranking higher for your target queries.
Another tool you can use is Semrush. It’s not just a content optimization tool–the platform’s an all-encompassing SEO software that can audit your site for technical issues, identify sites to build links on, and more. But for now, Surfer SEO is a good choice if you’re focusing on just your content.
Blog Post Editing
It doesn’t matter if you make a spelling mistake. Nobody’s pressuring you to perfect your sentences and structure on your first try. The main thing you need to do once you’ve finished researching is to sit down and write the thing from start to finish.
Editing an entire document at once can be daunting, especially if you’re on a strict time limit and the post is hefty or about a complex topic. So, instead, split up the editing tasks and take things one chunk at a time.
Spend five minutes going through the post and checking your spelling, then spend the following checking grammar, and so on.
Tasks such as improving the structure of the post will take longer, but as long as you keep this editing runs to a single task each, you’ll find them much less daunting, which means you’re less likely to procrastinate.
However, editing becomes a chore, especially if you don’t know what mistakes you’re making in your content.
The thing about you being the editor is that even if you checked your content multiple times, you wouldn’t detect the mistakes you’ve made.
This is because you don’t know they are mistakes in the first place!
This is why tools like Grammarly are heaven-sent.
It detects your content for potential errors that you must correct.
The tool has a Chrome extension, which is perfect if you’re writing straight to the site editor, such as WordPress. It underlines the mistakes you’re making in the article as you write.
This way, you’re writing and editing the content simultaneously. This makes your manual editing once you’re done writing much more effortless.
It also has a Google add-on so you can check your other blog posts before sending them over to clients for uploading.
As an added tip, I’ve also found that using a trackable editing checklist is a fantastic way to boost your efficiency in this part of the writing process.
Blog Promotions
After you’ve completed and proofread the blog post, it’s time to promote it to get more traffic to your website.
After all, the post won’t promote itself!
Also, you can establish credibility and authority if you successfully promote your content to your target audience.
Of course, this would depend on how well-written your content is. If you shared unique and insightful ideas in the post that would establish you as an expert in your field, you could position yourself as an industry expert.
From here, your blog post might generate comments, likes, and shares on social media. This can help you build a community of followers around your blog and increase the chances they will return to it.
Finally, promoting your blog post can also help improve your search engine rankings, as it can generate backlinks to your blog and increase the number of people who link to your content.
Again, you can only reap the benefits of your blog promotions strategy if you possess the writing skills for creating an authoritative and well-written piece, all of which we’ve covered above.
That said, below are ways to help you get started with your content promotions campaign:
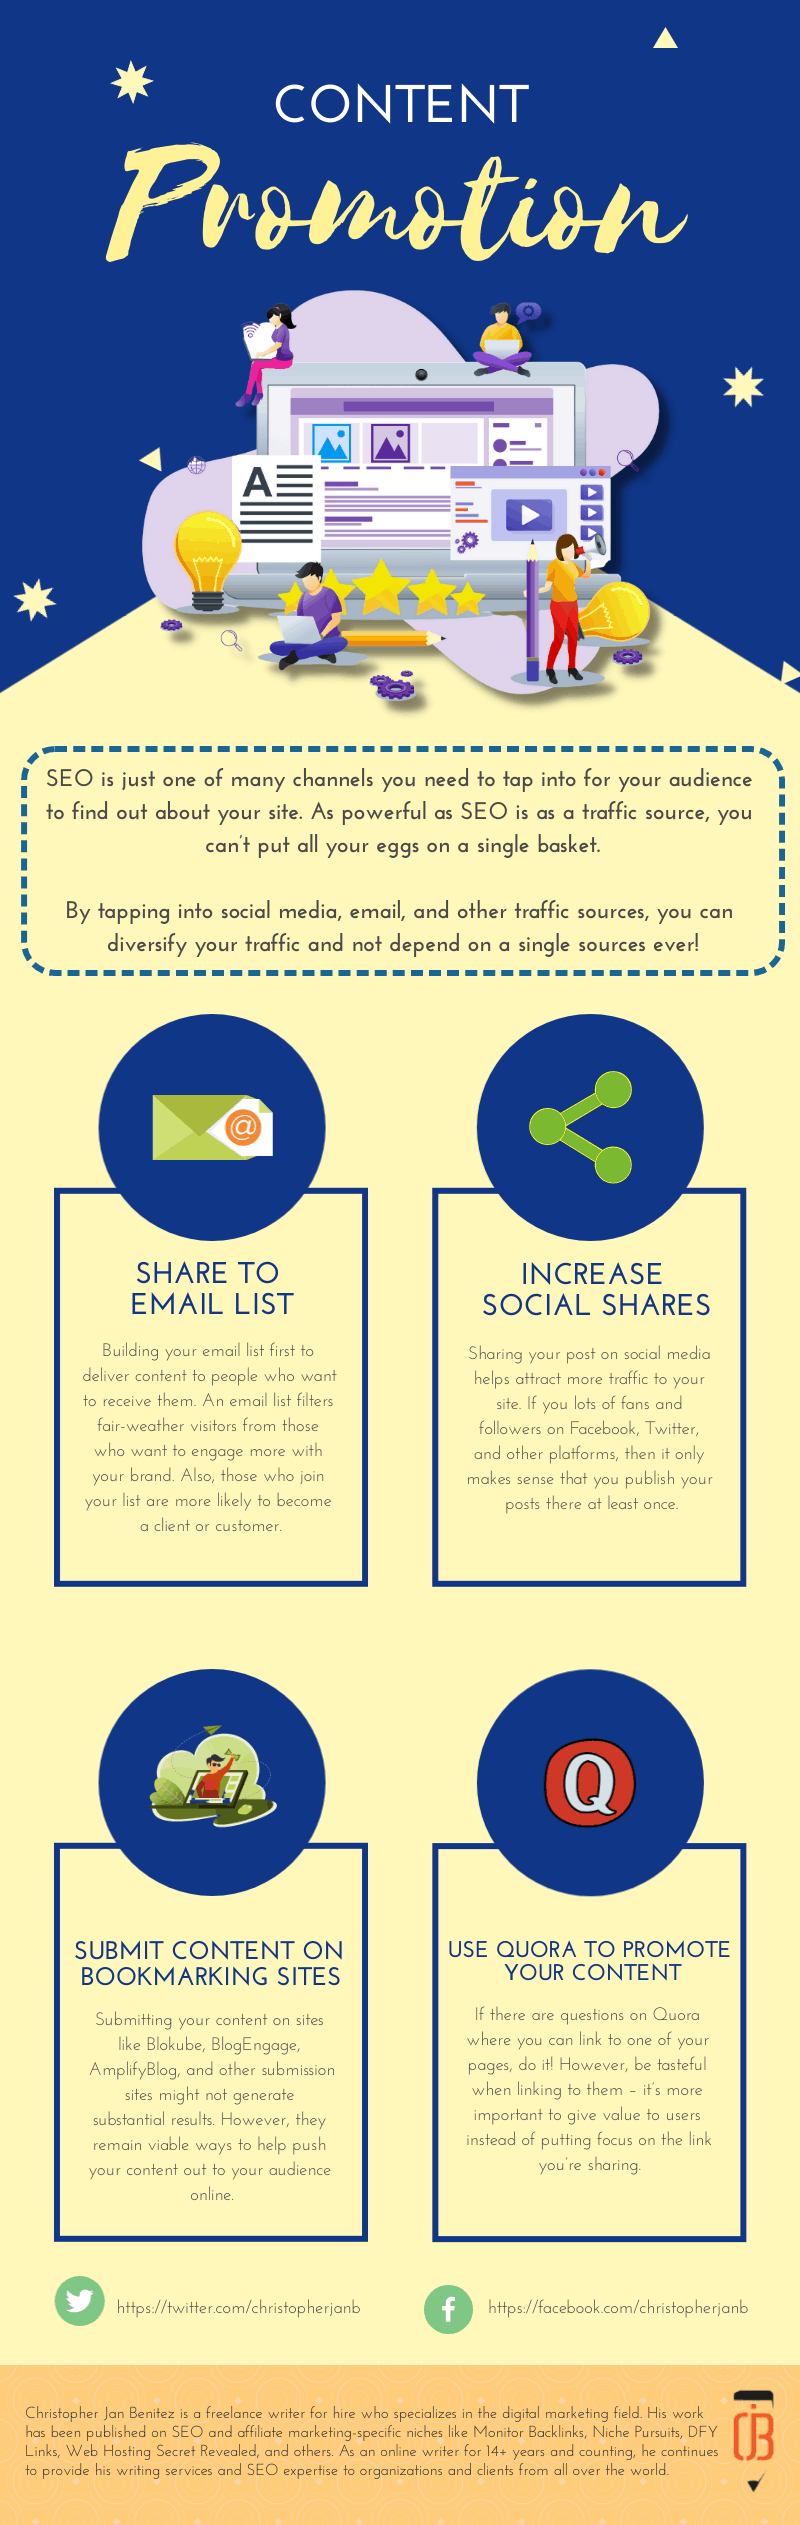
There are also great places where you can share your post online, so try getting your bearings there first.
How to Write a Good Blog Post: Final Words
Writing the perfect blog post takes A LOT of work.
It’s never about simply typing a bunch of words and making them sound good.
At the heart of writing a great post is understanding what your readers want and optimizing it to make the page appear on top of search results for your target keywords.
Whether you’re writing for clients or your blog, this how-to post hopefully helps you create better content for your first blog post or even your future posts. This way, you can get more clients, and attract more traffic.