A blog is a great way to make money online.
However, it’s never easy to make it big with your blog. It requires commitment, a sheer understanding of niches and industries, and writing prowess.
That’s why many are hesitant even to learn how to start a blog for beginners. With so many established blogs out there, many people think beginners can’t do the same.
But instead of thinking ahead, you must take it one step at a time.
Following the tips in this post, you’ll learn how to set up, grow, and maintain a successful blog even without initial blogging knowledge.
You’ll then eventually reach a point where your blog starts drawing thousands of daily visitors and generating profit off display ads and affiliate commissions!
So, let’s dive in!
Pick a blog niche
Picking a niche for your blog is one of the fundamental requirements of blogging today.
To start writing good blogs, you need to understand the niche you want to write. For instance, beauty, health, technology, and entertainment are some of the most popular niches.
What’s the benefit of picking a blog niche?
- Ensures expertise in one industry— through research or existing knowledge
- Better monetization as a definite audience is easier to write for
- Better grip on topics, and you won’t have to research again and again
- With time, your writing will improve and ensure that you make gripping content
Besides these benefits, picking a niche will also help you establish your blog in one particular industry. It doesn’t need to be too competitive or have no competition. So, pick a niche with just the right audience.
Choose a gripping name
What will be your blog’s name? How are your readers going to react to it? The more creative you get, the better.
Choosing a blog’s name doesn’t have to be complicated. Sometimes, things like that come to you naturally, so try to let them come to you naturally.
Force-fed blog names will only make it get lost in the shuffle; that’s something you don’t want. Moreover, you need something that easily fits into the URL.
You don’t want something like: www.itstoolongofaname.com. It’s unreadable and ridiculous. So, try to keep it natural and make sure it’s not extensive in length.
Choose a hosting and blogging platform
How you present your blog to your audience is essential. Upon visiting your website, they will notice how your blog looks and how fast it loads.
Based on these two factors, they will make a split-second decision on whether to stay or leave your blog.
If they don’t like how your site looks or feels, or if it doesn’t load fast enough, you can say goodbye to them!
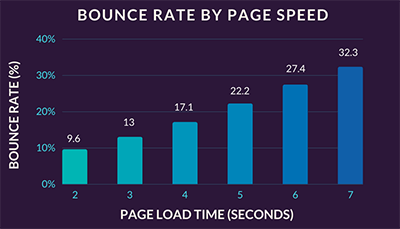
In fact, 22% of visitors will bounce away from your site if your site fails to load faster than five seconds.
To help improve your site’s performance, you must consider which blogging platform to choose first.
WordPress is the most popular content management system (CMS) used by bloggers today. It offers many features that make it suitable for creating content and generating revenue.
To be clear, we’re referring here to a self-hosted WordPress blog, not the free blog at WordPress.com.
The reason for going with the self-hosted version is it gives you more control over how you want your blog to work. This enables you to unlock the potential of your blog and achieve your goals faster.
The free version hamstrings you with limited options, making it more challenging to get your content across to your audience in the long run.
But before you use WordPress as your blogging platform, you must first select a web hosting platform.
A web host is where you store your website files so users can access them anytime.
There are many web hosts to choose from, but the most critical factor you must consider is speed and performance.
You want a web hosting service to use servers that load your website fast, regardless of the traffic you receive. This way, you can keep more visitors engaged with your site and build trust with them.
The web hosting platform I recommend is Cloudways. Its managed cloud hosting platform allows you to receive dedicated resources and support for your blog.
If you choose Cloudways, you can install WordPress with just a few clicks of a button.
Customize your blog’s design and layout

Even if you’re not a graphic design pro, WordPress makes changing your blog’s layout easy.
First, you can choose the WordPress theme for your blog.
From the dashboard, click on Appearance > Themes, then click Add New on the page.
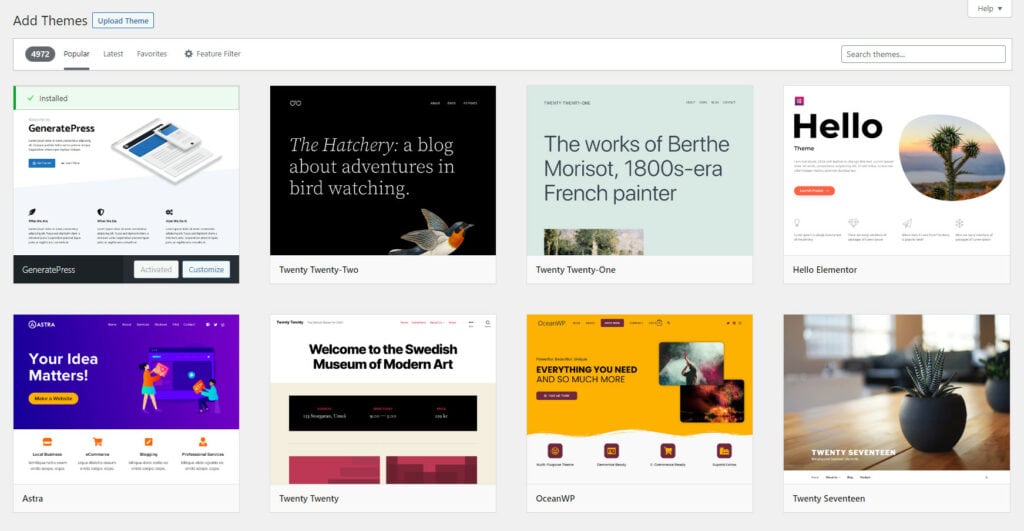
You will then have access to free WordPress plugins to choose from. Use the search bar to filter the list of themes that fit your niche.
Each theme possesses different features and options. In this case, take your time researching themes that have the features you’re looking for to supercharge your blog.
But one of the features you should look into is speed. Most free plugins are coded in a way that bogs down your blog’s loading speed due to unnecessary features.
So, while using free themes is an excellent place to start, you should also look ahead and consider using premium themes. They are coded well and provide the right features to get your blog to the next level faster.
Among the premium WordPress themes out there, I highly recommend GeneratePress. It’s a lightweight theme with a host of premium templates to choose from, so you can instantly create pages.
This blog theme also plays well with most plugins, so you won’t experience compatibility issues. We’ll get into plugins later.
From here, you can upload custom images and use fonts that go with any style or theme in just seconds. WordPress offers a variety of features, customization options, and ease of access that will make it easier to start your successful blog.
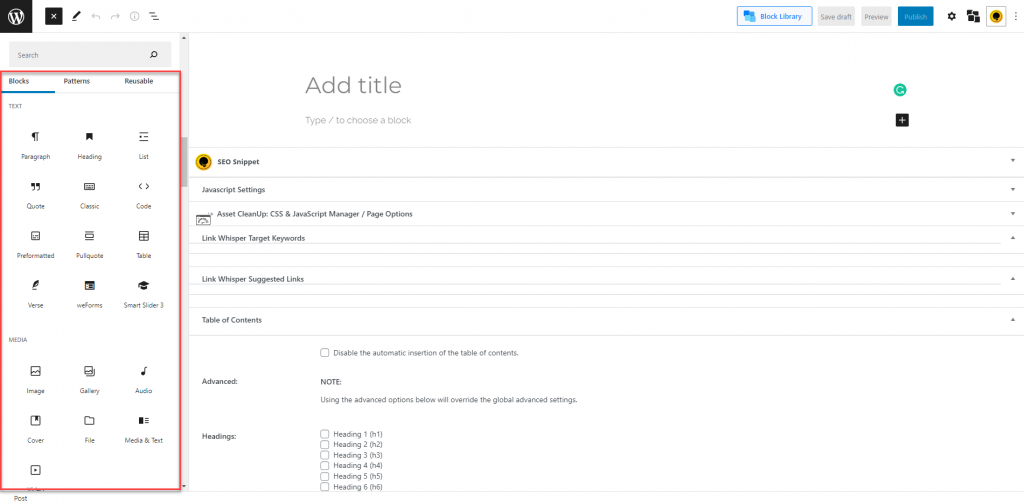
Unlike other platforms, thanks to Gutenberg block editor, you’ll also have plenty more freedom when featuring elements on your blog.
You can create blog posts and landing pages from scratch, even if you don’t have any design experience.
Install plugins and add important pages
To utilize the full power of your WordPress site, consider adding plugins and relevant pages.
Plugins are essential for bloggers because they can optimize your site and make it easier for readers. You’ll also see increased speed when using plugins, which means you’re more likely than not able to get a better return from them in terms of SEO rankings.
The plugins you add can change the look and functionality of your website.
Best of all, most of the best plugins are free and very easy to install.
From your WordPress dashboard, navigate to Plugins > Add New in the dashboard menu bar on the top left side under “Add A Plugin.” Next, search for the plugin you’d like to install and click “Install Now” and “Activate”.
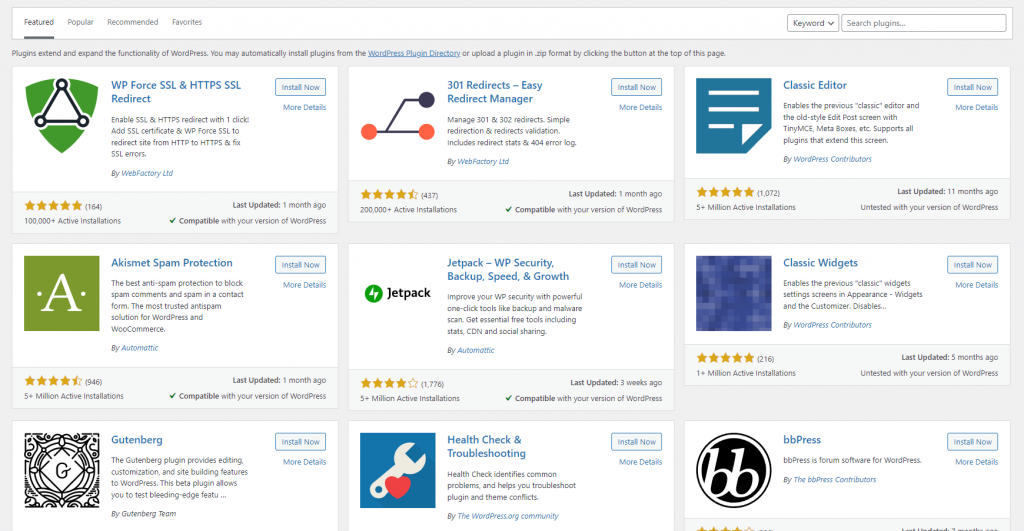
Below is a shortlist of free plugins I recommend you to download to get your blog off the ground:
- Yoast SEO – Apply its recommendations to increase your blog’s search visibility by ranking higher on Google for your target keywords.
- W.P. Super Cache – Load your blog faster and more efficiently to boost site speed.
- Wordfence Security – Set up a firewall on your blog to blog malicious traffic and allows you to scan your blog for malware manually.
- Ultimate Blocks – Add more Gutenberg blocks to choose from to help you create more engaging landing pages and blog posts.
- WPForms – Embed easy-to-create forms on any blog page to give visitors a chance to reach out to you.
- ShortPixel – Compresses all your images to make them load faster and more efficiently on your blog pages.
Adding pages to WordPress is straightforward. Simply navigate to the Pages section of your site and click on “Add New” at the top right corner.
Please make sure you name this page accurately. This is because it will be how people find things when searching through all posts written by other authors or topics relevant specifically to yours.
Learn SEO basics
Your blog will need SEO basics to make any sort of rank on SERP. But, you have to remember that you’re gunning for the top spot or one in search engines. So, you will have to learn some SEO basics, such as understanding the concept of optimization.
A few places for beginners to start are:
- Learn backlinking
- Ensure website speed and optimization
- Make sure your website is fit for mobile browsers
- Optimize content, such as meta descriptions & titles
- Adding images and retitling them as your keywords
- Adding informative value, quoting, avoiding plagiarism, etc.
These basic requirements of SEO will put you on the right track. While you can dive into them deeper, later on, understanding the basic concept of each of these search engine aspects will help you write ideal content for SERPs.
Note
If you want to learn the basic and advanced SEO tactics, you need to implement on your blog, head on to my white hat SEO guide. I discuss everything you must know about starting a blog that Google will love.
Brainstorm for blog topics
When you’ve finally set up your blog, it’s time to start writing. Naturally, you begin by picking a unique title for your SEO blog.
This topic will serve as one of the critical essentials of your content moving forward, so make sure it’s something unique.
Now, after picking a topic, you have to formulate a headline. So, let’s say you’re talking about traffic troubles in L.A.; here’s a generic title:
“How To Solve L.A.’s Traffic Problems”
A title like that in today’s age will only make your reader blow a raspberry. Instead, you need to make sure it’s something compelling and, as said before, unique. So, try going for something like this instead:
“10 Viable Solutions For L.A.’s Traffic Dilemma: How Flyovers & Intersections Can Be Fixed.”
This title is 10x better than the first one, but why is it superior? First, it offers ten ways a solution can happen; then, it provides one of the subheadings in the article as a glimpse into the information contained within.
Elements like that compel the user to click on topics like this. So, make sure you go for numbers instead of the genetic hows and whys.
But looking at the bigger picture, you want to produce blog posts consistently.
You can’t expect your new blog post to attract thousands of visitors—that takes years to write and churn high-quality content that your audience loves.
Before you get ahead of yourself, you must refine your brainstorming process for blog post ideas.
Coming up with blog topics readers want to see on your blog allows you to create a content calendar for these ideas. If possible, you can schedule them appropriately on your calendar, so you have something new to write about every week.
Writing the content

Now comes the most challenging part of blogging: writing.
At first, writing your very first blog post seems like a breeze at the beginning when everything feels new and exciting. Bloggers mainly observe the following tips below to ensure that their content is in tip-top shape:
- Don’t let your sentence be more than 15 words
- Keep paragraphs limited to three lines/sentences
- Use easy-going words, and avoid jargon/complicated terms
- Write for the typical reader, not the expert
- Simplify things, so research a lot before you type a single word
- Provide informative value, use stats, facts, images, data charts, etc.
Over time, however, when your blog becomes more of a chore, bloggers begin to dread writing blog posts.
Upon hitting writer’s block, your content contains careless errors and isn’t as tight as it used to be. It’s challenging to recover from this slump, most likely due to fatigue from writing too much.
However, you won’t have to experience writer’s block if you have a refined writing process that allows you to create excellent blog posts that your audience and search engines love.
Below are techniques to help beef up your blog content writing process:
Do some research on the topic
Researching before writing is always a helpful way to streamline your work process and ensure you’re not wasting time on something unneeded or boring.
This can be especially true when it comes down to the task at hand to get everything done correctly without any unnecessary stress.
The best way to do research is to organize all the information you’ve gathered about a topic into an outline.
Once you have the bullet points for your blog post, all you need to do is flesh out the details of each point in your article. This way, you can refer to your outline and not have to go back to researching again for the information.
Get headlines that will hook your audience
Headlines are incredibly relevant in any article.
They have the duty of enticing readers and capturing their attention before an entire piece is read while appearing on social media feeds or Google search.
This means they need to be creative enough for people who don’t always read articles thoroughly!
One of the best tips for writing blog titles is to develop different versions of the same title and split-test them using a tool like Nelio A/B Testing. From here, you can see which version receives the most clicks from visitors via social media or search engine results pages (SERPs).
You can then run another test by pitting the winning variant against a new version to see which performs better. Keep doing this to help you increase the click-through rate of your blog posts.
Give your blog an instant personal touch by adding pictures or videos
Use the power of images and videos in your blog post. In addition to adding personality, they also help readers connect with them.
The great thing about it is that you can do this without hiring a professional photographer or graphic designer.
This is because many photo editing apps are out on the market now, making things more accessible than ever. For instance, it can be highly effective to incorporate an intro video on the homepage of your website to draw your visitors in.
Optimize it!
Observing the best SEO practices in content writing is arguably the best way to generate traffic to your blog.
When done correctly, you can rank your blog post on top of Google organic search for multiple keywords that people search for hundreds of times in a month.
That means your site’s potential clicks can generate from your search rankings can compound to thousands of visitors in a month!
To do this, you may need to use a tool to help you keep in line with these SEO practices.
Yoast SEO has a robust Content Analysis feature that lets you know how optimized your content is for your target keyword.
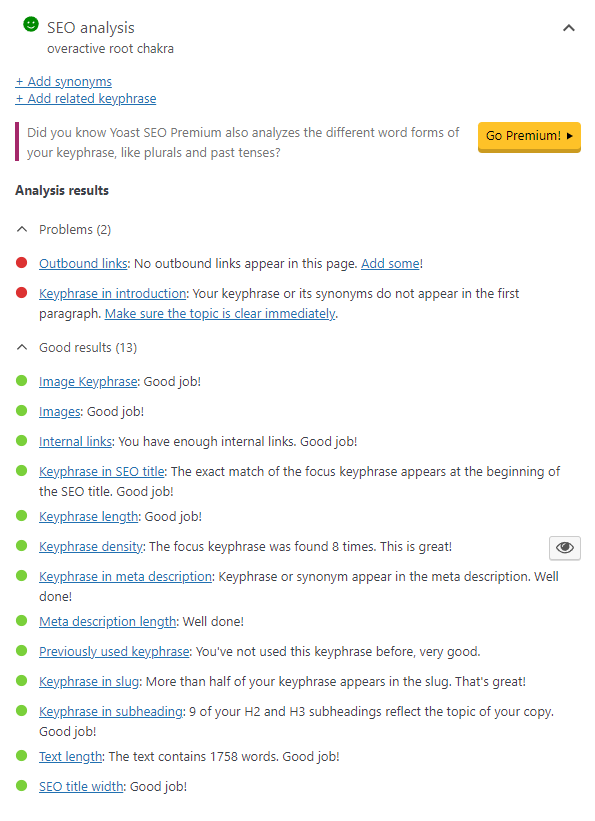
As good as this feature is, it’s not enough to rank your pages for your search queries, especially if you’re going up against authoritative websites on SERPs.
A premium tool you can use is Surfer SEO.
Its Content Editor feature alone is worth the price of the admission.
The idea here is to create content that covers the topic in-depth by mentioning words and phrases relevant to the topic.
This way, you associate your blog posts with terms that strongly correlate with the topic. Search engines will then view your content as relevant to the topic you’re optimizing for, thus indexing your blog post highly on SERPs!
Upon entering your target keyword(s), the tool will list down terms and entities relevant to your keyword that you must include in the post.
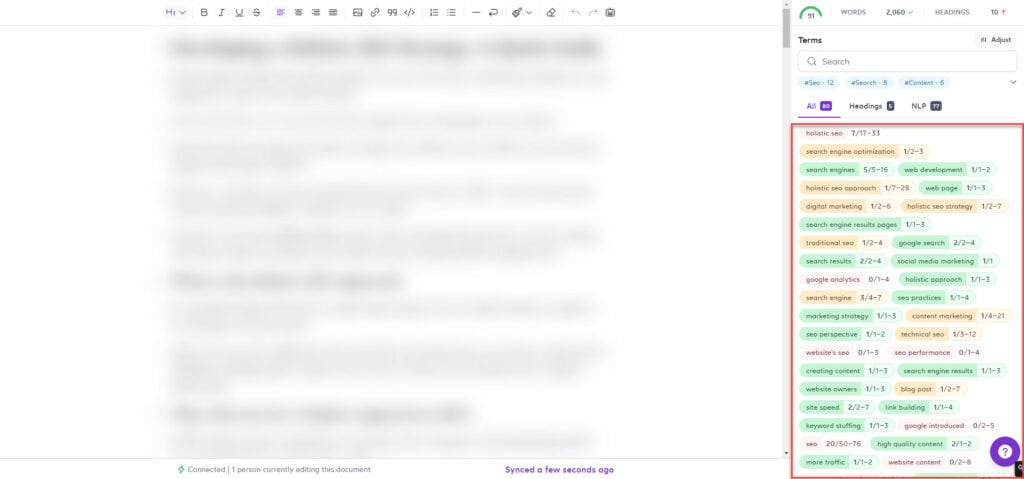
Mention the best phrases that help add value to your post to increase your score.
Surfer SEO also checks the content for its structure and number of words relative to your competitors.
This helps you create structurally-sound blog posts with well-spaced paragraphs, straight-to-the-point sentences, and proper use of visual content to break the monotony of text.
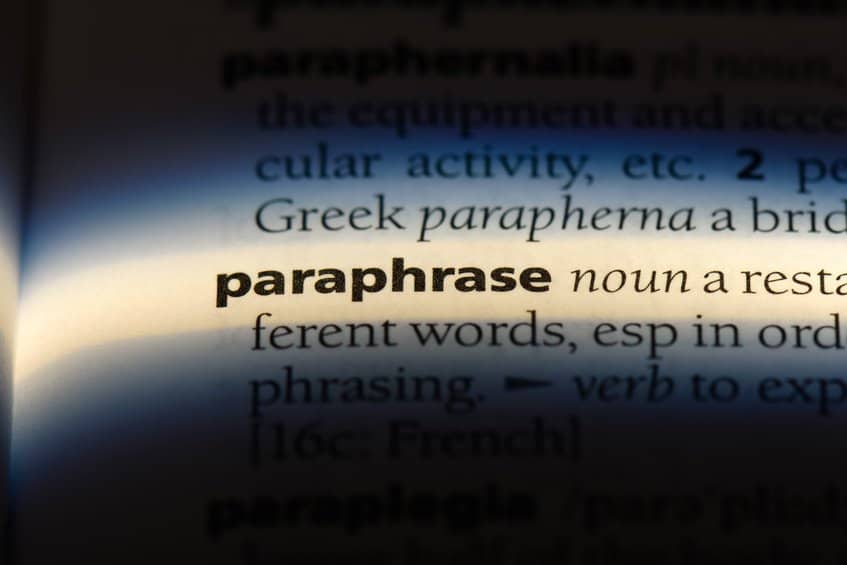
Check plagiarism
Plagiarism is one of the things that you need to avoid necessarily. So, head to a free tool to check for plagiarism with your short blog posts.
Don’t worry; accidental duplicity can happen, and you can easily avoid that—one percent at a time.

Fix mistakes and errors
The last thing you need to do with your blog is ensure it’s up to standards.
And while you’d think reviewing the post from top to bottom many times should be more than enough, it’s possible that you might miss errors that you normally wouldn’t spot.
In this case, use an online grammar corrector to fix any errors in your article. This way, your content will be easy-to-read for your readers and search engine crawlers.
The tool I recommend (and the only grammar checker tool you’ll need) is Grammarly Premium.
While the price is steep compared to other tools, it provides you with the best suggestions to help fix your grammar and punctuation and tighten your writing.
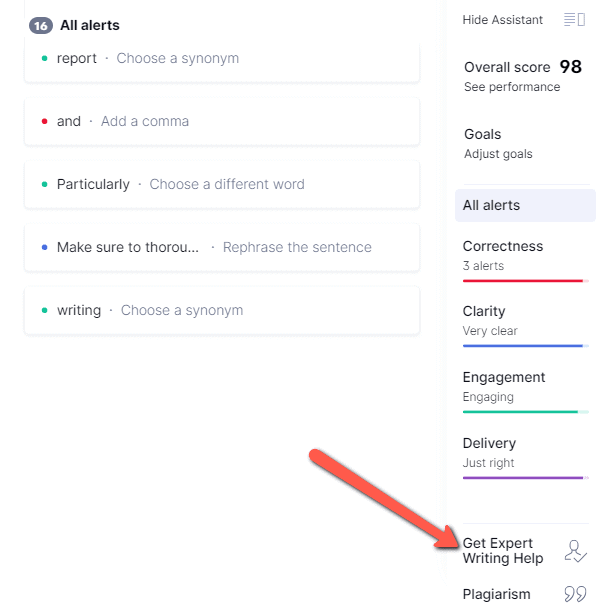
It works well when writing your posts on Google Chrome and straight to WordPress. If you use Google Docs, you can install the Chrome extension so you can see its suggestions on your document page.
Monetize your blog
Even before your site generates traffic, you should consider how you plan on making money blogging.
Your monetization options depend on the niche you’ve chosen and the search intent of the keywords you plan on optimizing for it.
If there are many related products you could sell on your blog, you must go the way of affiliate marketing.
This includes writing blog posts optimized for commercial and transactional search intent. Examples include search queries with the phrases “(product 1) vs., (product 2),” “(product) alternatives,” “best (product) for (audience),” and more.
From here, you should find affiliate programs to sign up for. Start with online marketplaces like Amazon that carry virtually everything related to your niche.
Another upside is that you can use many plugins to make selling and making money off Amazon products much easier.
Tools like Amalinks PRO allow you to create irresistible featured boxes and tables showcasing Amazon products instead of just a simple link. This helps increase clicks on your referral links and generate more affiliate commissions.
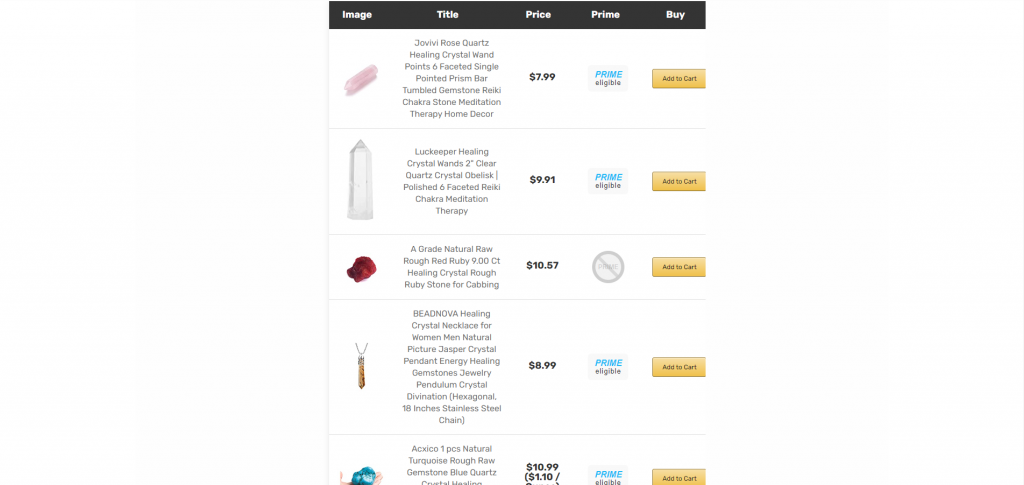
More importantly, the plugin lets you use its best features without API access. This means that you can create the boxes and table to get more affiliate sales even if you’re a new Amazon Associate or have yet to sell anything as part of their program.
Once you gain API access upon selling more Amazon products, you can fully unleash the plugin’s power.
The downside of Amazon affiliates is its meager commission rates. The company recently decreased its rates in 2020, much to the chagrin of Amazon affiliates. And there’s no telling when they plan on dropping the rates again.
While Amazon remains a viable affiliate program, you are highly encouraged to join other affiliate programs to generate more income from your blog.
Promoting them on your blog won’t be as easy, but the commission rates should be higher than Amazon’s, making it worthwhile.
Now, if your niche mostly has informational keywords, you can still monetize your blog via display ads.
The simplest way to do this is by joining Google Adsense once your site generates enough traffic.
Once approved, Google can take care of optimizing the ad placements on your blog.

However, the best way to make money from ads is to insert them in your blog and split-test the placements manually. You must choose which banner sizes to feature on your blog and where they should appear.
When it comes to display ads, Jon Dykstra is the master, as he’s been generating more than $60k/month from his blogs, mostly from this monetization tactic. Check out his blog and subscribe to his excellent email list to learn more.
The caveat with making money from display ads is the volume of your blog traffic.
Unlike affiliate marketing, your earning potential depends on how much traffic you can generate for your blog.
The more visitors you can generate, the higher your income from display ads.
Start promoting your blog site and watch it grow
It can be challenging to get people to read your blog posts. You might spend a lot of time writing them, but if you don’t promote them on social media, not many people are likely to see them.
Promote your blog and start attracting new followers with the following tactics.
You can start by sharing your blog posts on sites where most of your audience is. Social media is the most obvious answer, with millions daily active on sites like Facebook and Twitter.
Posting your blog posts on your feed or sharing them with blogging community groups should help your blog gain traction.
Also, consider pinning your posts on Pinterest, which drives lots of referral traffic to bloggers.
If you wish to go all-in on social media for your blog promotion strategy, use a tool like MissingLettr.
Unlike most tools where you have to create the snippets to be shared on social platforms manually, this tool will draw content from the blog post that will be used on the social posts.
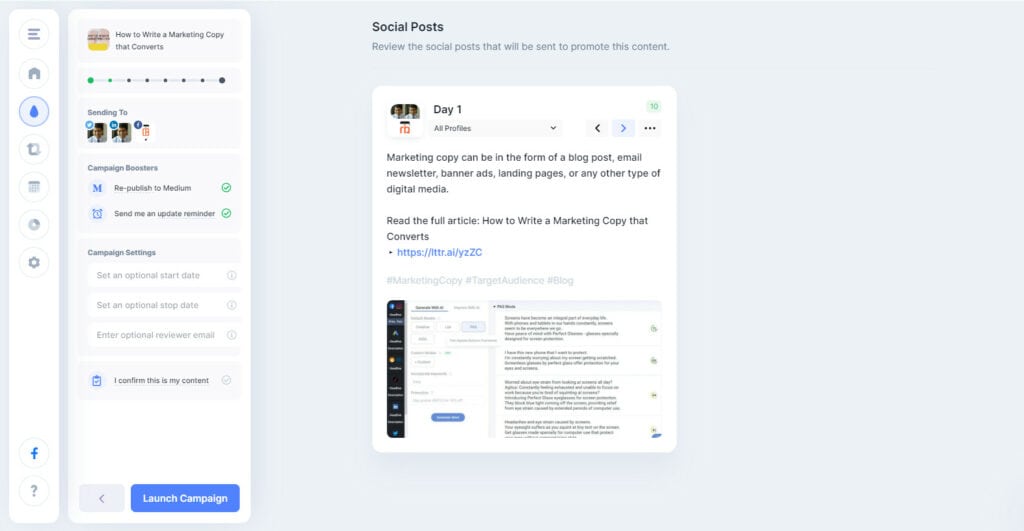
It also generates images published alongside the text for your social posts. You can then download the photos to be included in the blog post if you wish.
Finally, its Curate feature allows you to load up your social calendar with relevant posts from other users. You can also get other users to share your posts on their social feeds. It’s a win-win for all parties involved!
Publish guest posts

Guest blogging refers to the process of getting a post published on another site.
There are two reasons why guest blog posts still work:
- You get to showcase your writing on a blog with more traffic and popularity than yours. If they enjoy your content, they can check your blog for more of your work. The referral traffic from guest blogging could lead to more subscribers to your email list or clients for your services.
- You can get a backlink to your site, increasing your keyword search rankings. The more backlinks you can secure from authoritative sites via guest blogging, the faster your blog can rank at the top of SERPs!
These reasons alone should encourage you to build a guest blogging strategy that allows you to do the following:
- Find guest blogging opportunities using different metrics to determine their authority. The goal is to target popular and high-traffic blogs to write your guest posts so you can leverage and transfer some of their power to your blog.
- Perform blogger outreach using a tool like Ninja Outreach so you can reach out to prospects using tools that help you find their emails using an email finder tool like ContactOut and send automated follow-ups to your initial email.
I have detailed most of the steps above in my guest posting tutorial videos that break down the complete step by step. Some of the tools mentioned in the videos are outdated, but most of the steps are still applicable today if you want to maximize your blog.
Did this how to start a blog for beginners guide help you in any way?
These are some of the essential beginner elements of writing a good blog. Besides picking your niche correctly, you must ensure your blogs are unique and feature great content. So, focus and improve as you go along.
Need help with setting up your blog? I’M YOUR GUY!
I’ve created multiple WordPress blogs before, so if you’re looking to set up one and create content for your business, call me and let’s make it happen!